Every now and then, there are technical support questions that are asked more than once by different users. This article seeks to address a couple of “how to” questions that have come up over time. As such, this isn’t a massively technical paper just a quick look at a few things that might make your modeling experience more fun and your models a little more interesting.
Background: This is a physical screening clinic similar in nature to those you might encounter either in the military or in a hospital that supports a large industrial area where employee physicals are required either by insurance companies or an employer. That said, it could even be a part of a much larger function like an ER. In a nutshell, patients that represent a mixed population of both men and women, are sent to the clinic without an appointment and arrive according to an exponential distribution. In the model, the mix of men and women is 50-50 although it can be altered to accommodate any distribution of patients. Once a patient registers, he/she is either directed to a gender-specific changing room where they change into a white surgical gown, or take a seat in the waiting room until a changing room is available. Once changed, each patient is escorted to an exam room by one of two nurse practitioners, is examined for a time period that is also gender-specific (men – normal(20,5,1), women – normal(17,3,1)), and is eventually released to return to a changing room and finally to leave the clinic. Any time there is no changing room available, patients take a seat in the waiting room. The clinic opens at 0800 hrs and closes at either 1600 hrs or after 1600 hrs when the last patient departs. Open and run the model, “changing-rooms-model-11-16-2016.fsm” to see the model in operation.
- Modeling challenges: The challenges are straight-forward and not at all complex. Specifically, they address the following questions:
- How do you stop patient arrivals (e.g. in-flow) at a certain time of day and then close the clinic when the last patient departs?
- How do you make sure that patients go to their own gender-specific changing rooms?
- How do you change a patient’s shirt color to white representing a patient gown and then back to their original color when they change back into their street clothes?
- How do you use a patient label to determine treatment time if a distribution is contained in the label?
- Flow Chart: Before we dissect the model, it’s probably not a bad idea to take a close look at the flowchart if only because, despite the model’s size, it can seem a little complex.
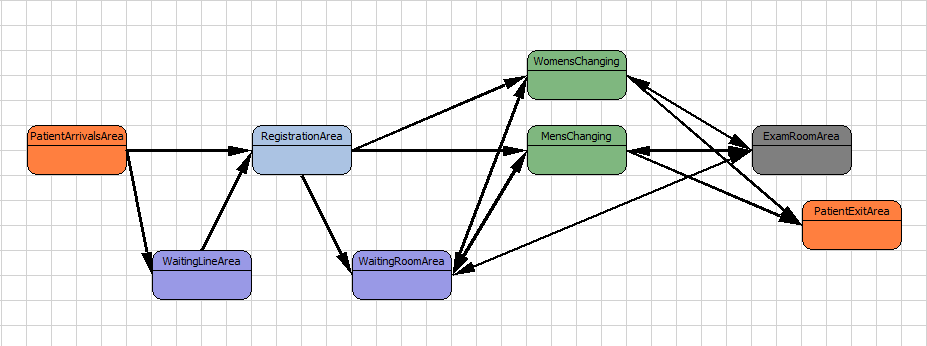
Notice that the changing rooms really are the central point in the model. As such, connecting lines have to be constructed that link the Registration Area (0ne way), the waiting room (two way), the exam area (two way) and the Patient exit (one way) with each of the Changing rooms.
- Setting the Stage: Because the purpose of this model is to make provisions for and track both male and female activities, it uses two different PCIs (Patient classification Index numbers) to represent Men (PCI1) and Women (PCI2). Those PCIs and any related labels that may generally carry information about patients that might be used for decision making later, are initially entered in the Track Manager, under the tab labeled, "Patient Classification” as shown to the right.

Note that, in this case, there are fields for identifying which Track a specific PCI will follow, what each PCI’s Acuity will be, which Gender different PCI’s will represent, which distributions represent each PCI’s Exam Time in the model, and a direct reference to which changing room a patient should use. Needless to say, each of the three types of fields – text, number and code – are accessible from various elements of the model and may be used to determine and isolate almost any patient characteristic a modeler might use to define patient Activities.
One other “setting the stage” aspect of the model that deserves mention is the positioning of the nurses.
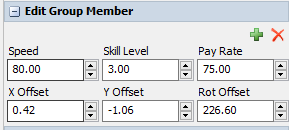 Note that the two nurses aren’t arrayed in a single line, the default positioning of resources in a model, but rather are positioned as if they're having a conversation. Although somewhat inconsequential when a resource staff is small, large collections of staff members cry out for better, more life-like poses. To change a resource’s initial location in a model relative to its home base - in other words, it’s “Offset” – first make sure the model is in “3D View” by clicking on View>Model View (3D) in the main menu. Then, simply click on the individual resource and drag it to the place you’d like it to stand as its initial position. Note that the X Offset, Y Offset and Rot Offset values that are unique to each member of a resource group, will automatically be changed to the new coordinates. Finally, note that by clicking and holding down your left mouse button over any of the Offset positioning arrows (circled in red above), and then moving your mouse forward and back, you can also manually reposition any specific resource.
 - Arrival Pattern : Open the Properties window for the Patient Arrivals Object to follow this discussion . The Patient Arrival pattern is simple to construct, involving nothing more than identifying the correct exponential distribution (i.e. exponential(0,20,1)) in the Patient Arrivals Properties’ Interarrival Time field as shown at the left.
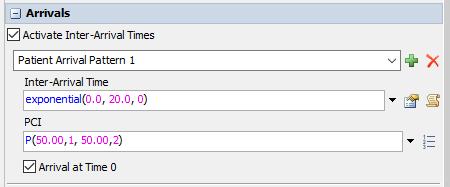 Notice also that the Patient Classification Index (PCI) field contains an expression to calculate and therefore generate two different PCIs. As mentioned previously, PCI 1’s are classified as men and PCI 2’s as women. In this case P(50.00, 1, 50.00, 2) insures that a mix of 50% men and 50% women will be generated by the Patient Arrivals Object during the model run.
 - Setting Certain Patient and Model Characteristics : The purpose of the Patient Arrivals object isn’t only to create a unique pattern of patient arrivals but also to serve as the source of every patient’s initial characteristics as well as set certain actions that affect the performance of the model as a whole. In this case, changes to the patient’s appearance and the stopping time for patient arrivals are both determined in two different Patient Arrivals’ Property Triggers as shown at the right.
- Note that the “On Creation” Trigger is used to identify any actions the modeler might want to activate that occur when a patient is created for entry into the model.
As shown, picklist option can be used in the On Creation Trigger to change any number of model parameters
In this model, only that referring to the patient’s shirt color is changed.
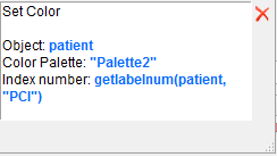
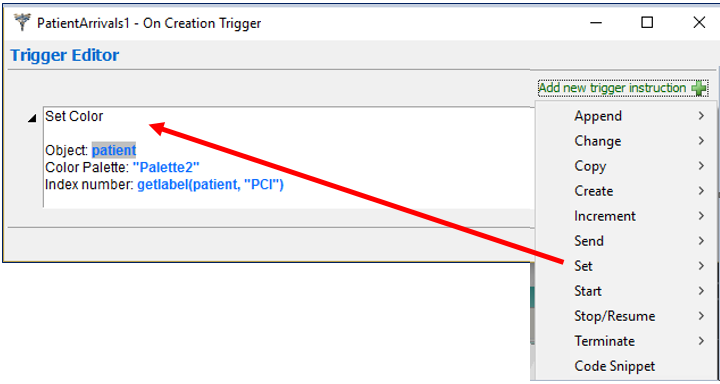 In this case, there are three entries to select from … (1) the fact that the patient’s shirt color should be changed, (2) which color palette should be used to obtain the desired color (Palette2), and (3) which color (by index number) should be used. Note that the color index number is determined by the patient’s PCI of either 1 or 2.
 Different palettes unique to the software can be viewed by selecting, “Edit > Color Palettes,” from the software’s main menu. Note that new palettes and/or colors may be added to the color palette editor by selecting the appropriate functional options (ie. Add/Delete Palette, More/Less colors). In this case, Male patients will wear green shirts and female patients will wear yellow.
-
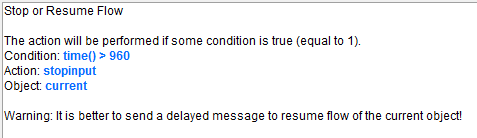
Note that the “OnExit” Trigger is used to identify any actions the modeler might want to occur when a patient exits the Patient Arrival object. In this case, the picklist option, “Stop or Resume
 Flow” is selected to act as a brake for patient arrivals after a specified elapsed time. Although there are seven different drop down options to select from regarding the condition desired to stop patients from entering the model, the option “time()>960” is selected to stop arrivals at 1600 hrs (4 p.m.). Note that “960” represents the elapsed time in minutes since midnight (time 00:00) of the first day of the model run. Many first time modelers make the mistake of assuming that the time value represents the elapsed time since the model’s beginning time, in this case 8 a.m., which isn’t the case. In any event, this picklist option examines the time of every patient’s departure from the Patient Arrivals object and the first patient created at or after 1600 hrs, automatically stops any additional patients from being created.
- Note that the “On Creation” Trigger is used to identify any actions the modeler might want to activate that occur when a patient is created for entry into the model.
-
Closing the Clinic’s Doors and stopping the model . Open the Properties window for the Patient Exit object to follow this discussion. Clearly there are two actions that are
 required to close the clinic at or after 4 p.m. when the last patient departs. The first is to close the front door which is accomplished by the “OnExit” Trigger found in the Patient Arrivals object as discussed in paragraph 5B above.
 The second is accomplished in the Patient Exit object’s “OnEntry” Trigger as shown at the right. In this case, the drop down picklist option, “Stop Model Based on Condition,” is selected and used to establish two criteria for the model’s end. The first criteria is that the elapsed time be later than 4 p.m. and the second is that there be no patients in the clinic when 4 p.m. arrives. The correct entry for the picklist option then, is shown at the left and takes both circumstances into account.
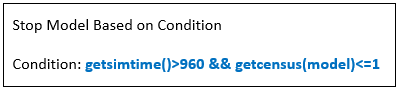 What it determines every time a patient leaves the clinic is, what time it is and if anyone remains to complete treatment at that time. If the time is even a second past 4 p.m. and the clinic census is zero, the expression stops the model.
 - So far, we’ve accomplished several tasks that include, (1) setting the patient’s shirt color, (2) establishing a criterion for closing the clinic door at 4 p.m. and stopping clinic operations at or after 4 p.m. when the last patient leaves, and (3) positioning resources at various places in the model rather than in a single straight line. Now, we need to change the patient’s shirt color to white – symbolizing changing into an examination gown – and back to its original color when the exam is over, and determine the patient’s Exam Time. It’s a simple process that we’ll cover in Activities 40, 60 and 80.
-
Activity 10_Arrival: This activity causes the patient to walk unescorted from the Patient Arrival Object to the Registration Area. Although there’s nothing complex or unfamiliar about the activity, it’s important to note that even though this activity has no predecessors, a check mark is still required in the Predecessors box to cause the model to begin this activity without a command from some other activity.
-
Activity 20_Registration : This activity causes the patient to use someone from the ClerkGroup at the Registration desk for normal(2,1,1) minutes to log in.
-
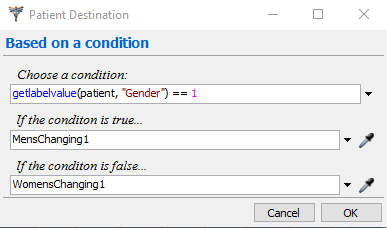
Activity 30_TravelToChange1:This activity causes the patient
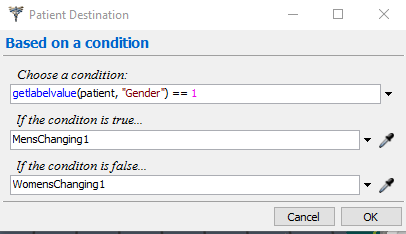 to walk unescorted to one of the two changing rooms based on the patient’s sex. As such, which of the changing rooms is determined by the entry in the Patient Destination field, in this case, from the drop down picklist option, “Based on a Condition,” and by the edited drop down option, “getlabelnum(patient, "Gender") == 1 as shown to the right. Note that there are actually 12 different, “Choose a Condition” options the modeler can employ to set the patient’s destination.
 -
Activity 40_Change1 : This activity causes the patient to take normal(3,1,1) minutes to change into an examination gown and changes the patient’s shirt color from either green or yellow to white representing that change. The expression that causes the color change is
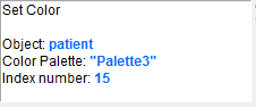 contained in the Advanced Function, “Activity Finished Trigger.” In this case, the drop down picklist option, “Set Color” is selected to change a patient’s shirt to white as shown to the right. White is the color whose index number is 15 in the color palette 3.
 -
Activity 50_TvlToExam: This activity causes the patient to be escorted by a member of the NurseGroup from the changing room to the first available Exam room.
-
Activity 60_Exam : This activity causes the patient to spend a period of time specified in the Processing Time field being examined by the same
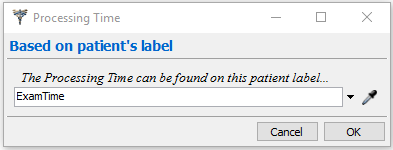 nurse that escorted them to the Exam room. Note that the exam time is entered by selecting the drop down picklist option, “Based on Patient’s Label,” and then by selecting the Patient Label, “ExamTime,“ that was previously set in the Patient Classification Index (PCI) Table. See Paragraph 3 above.
 -
Activity 70_TvlToChange2 : This activity causes the
 patient to walk unescorted to one of the two specifically named changing rooms. As such, which of the changing rooms is determined by the entry in the Patient Destination field, in this case, from the drop down picklist option, “Based on a Condition,” and by the edited drop down option, “getlabelnum(patient, "Gender") == 1 as shown to the right. See paragraph 7C for the same logic initially entering a changing room.
 -
Activity 80_Change2 : This activity causes the patient to take normal(3,1,1) minutes to change out of their examination gown and back into their street clothes by changing
 the patient’s shirt color from white back to their original color. The expression that causes the color change is contained in the Advanced Function, “Activity Finished Trigger.” In this case, the drop down picklist option, “Set Color” is again selected to change a patient’s shirt to its original color using the patient’s PCI number. Note that this is the same way the shirt color was assigned initially. See paragraph 5A
 -
Activity 90_Departure: This activity causes the patient to walk unescorted to the clinic exit and leave the model.
-
- Special Notes regarding the Changing Room model . As simple as the model may seem, it serves to reinforce several modeling techniques that we sometimes overlook. For example, …
-
All activities are assigned unique Milestone names. In this case, TvlToChange1 and TvlToChange2 are identical in every respect. However, Change1 and Change 2 aren’t. To combine the four different activities into two identical activities would change the Patient Timeline widget in the Dashboard so that a patient’s time spent waiting for a nurse following the first Change would be combined as a single display element. This might make it difficult to glean specific information from the Timeline regarding total time changing and waiting for resources.
-
The use of floor displays and walls to enhance a model’s appearance is highly encouraged. To design effective and realistic models, practice using the Infrastructure tools to create underlying floors and the Library tool, “Visual Objects,” to create enclosures.
-