question

Mike Mayer avatar image
0 Likes"
Mike Mayer asked Mike Mayer commented

Conveyor T-intersection Round Robin if Available?

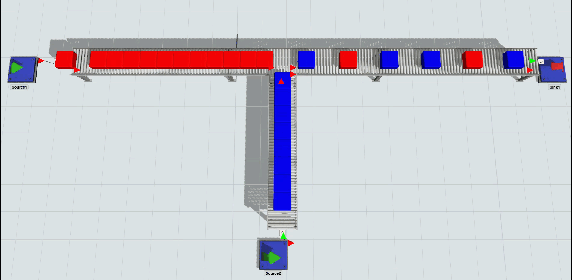
If you "tee" a conveyor into the side of a main conveyor, the main conveyor has precedence over the one coming in from the side. In other words, flowitems coming in from the side have to wait (and possibly back-up) until there's no flowitems on the main conveyor at that T-junction - or, when there's space (or a gap big enough between flowitems). Only then will a flowitem (or flowitems) from the side conveyor flow onto the main conveyor, smoothly and visually correct.

The problem of course, is flowitems backing up on the "side" conveyor if the main conveyor has lots of flowitems moving on it. We'd like to force the main conveyor to stop, and accept one flowitem from the side conveyor, then one from the main conveyor, alternatingly, until there is no more contention at the T.

What I need to do is put a "traffic cop" at the T intersection, which will alternate flowitems onto the main conveyor when there is contention from both the main and side conveyor, trying to merge into the main conveyor. Such that they will interleave every other flowitem, onto the downstream conveyor. Unfortunately, connecting a conveyor to the side of a main one does not do this by default (nor does it have any options to invoke a Round Robin style T-intersection by default).

I have successfully done it though, by breaking the main conveyor into two conveyors then reconnecting them "head-to-toe" as two contiguous conveyors (still looking like a single long main conveyor, except for the inline transfer visible at the break point). Then, attached the side conveyor near that break point.

I then do "A" connections from the side conveyor and the incoming part of the main conveyor, to the downstream part of the main conveyor. I then tell the Entry Transfer on the downstream conveyor to Pull "Round Robin if available" from the two Exit Transfers - the one on the end of the side conveyor and the one on the end of the incoming portion of the main conveyor, into the T-intersection.

Lastly, I remove the default Inline Transfers (the transparent square double staple-looking thingys) that appear whenever you stick two conveyors together. I have to remove these default inline transfers because they interfere with the logic of the white Entry / Exit Transfers from the A connections I had just created.

This logic works well actually. Whenever there is contention at the T-intersection (i.e., two flowitems, one from each conveyor, wants to enter the T-junction), the Round Robin If Available Pull will then start alternating flowitems - one from the side, one from upstream, one from the side, one from upstream, and so on, until there's no more contention at the T intersection.

The result is that as long as there is contention at the T-intersection, the downstream conveyor will have alternating flowitems on it. When only one conveyor has flowitems entering the T-intersection, its flowitems flow freely onto it as usual (thanks to the "...if available" logic in the RR pull). It's only when there are flowitems present at the ends of both inbound conveyors, that the alternating RR if available kicks-in.

However, the problem is that the flowitems jump forward half their width as they are entering the T-intersection, as well as overlap and mash together as they alternatingly flow through the T-junction area to the downstream conveyor. So while the logic seems to work, the jumping and overlapping of flowitems in zero time makes the simulation look a bit sloppy at the T intersections (we have lots of them), and during discussions has drawn people's attention to the condition to the point of thinking it's a flaw in the simulation "i.e., that's not how it works in the plant".

I can fiddle with the placement of the white exit and entry transfers in the T-intersection area, to strike a balance between jumping and overlapping flowitems, but it's not completely eliminated and is still distracting.

I have tried using the Merge Controller several times but cannot get it to do a simple traffic cop-style alternating at the T-intersection whenever there is contention at the T-junction area.

I've also played with introducing two orthogonally opposed processors (90 deg from each other) and played with .stop and .resume, as well as opening and closing ports, to try to smooth things out. So far no luck on that (and it got pretty messy).

I saw lots of uses of Merge Controllers in FlexSim Answers, but nothing jumped out at me as far as a method for doing simple T-junction contention handling in an alternating flowitem fashion. It gave errors that conveyors were not slugging conveyors, and that slugging conveyors (when I made them so) are not generally permitted along the length of another one. So, I was not able to use the Merge Controller.

So for now, the best I can do is find the right balance between jumping and overlapping flowitems at the T junction, by tweaking the entry and exit transfer locations, the main conveyor "break point" location, and using the "Round Robin if available" pull on the single entry transfer.

Thank you for any guidance.

FlexSim 24.0.1
conveyorsround robinintersections
5 |100000

Up to 12 attachments (including images) can be used with a maximum of 23.8 MiB each and 47.7 MiB total.

1 Answer

·
Regan Blackett avatar image
0 Likes"
Regan Blackett answered Mike Mayer commented

I think you can get the behavior you are looking for by acquiring and releasing a restricted area around the T intersection.

If you have a decision point at the "entrances" to the T intersection on each conveyor, you can use the arrival trigger to acquire the area. The in another decision point that represents the "exit" of the intersection you can use the on continue trigger to release the restricted area. Connect the acquiring decision points to the releasing decision points and you should get this behavior:


2024-01-26-14-29-38.gif


Here's the model too round robin at T intersection.fsm


· 8
5 |100000

Up to 12 attachments (including images) can be used with a maximum of 23.8 MiB each and 47.7 MiB total.

Mike Mayer avatar image Mike Mayer commented ·
Thank you Regan. I had read about Restricted Areas but did not realize you could use it for something like a conveyor T junction. Of course, now exploring the Manual I indeed did find it, along with examples of restricting a conveyor area. Very clever, and works great. No more jumpy smashing flowitems. Thanks for the pointer.


As it's doing it's thing, we know that the side conveyor must wait until a gap opens up on the main conveyor, as wide as the flowitem (in our case, it's the diameter of our round flowitems). Only then is the waiting flowitem permitted to slide from the side conveyor onto the mainline conveyor, and follow the others, in interleaved fashion, when there is contention at the tee. This of course creates gaps on the downstream conveyor portion, which is correct behavior because of the "slotting-in" strategy at the tee. And is noted in the documentation.

To pack more flowitems onto the main conveyor, I have had some success switching the max angle of a side transfer to be 91 degrees (while the side conveyor is really still 90 degrees), which allows me to treat it as an inline conveyor instead. This has the bonus of allowing the flowitems from the side conveyor to slide in nicely, and smoothly, following right behind the tire coming out of the intersection while the gap is still forming on the mainline (i.e., not waiting until the gap has fully formed on the mainline). This allows the flowitems downstream to have no gaps. However, I am not sure that is correct in the real world, but thought I'd try it. Essentially, it seems to allow tires to enter the mainline conveyor before the entry space is fully formed there, which at least visually looks more consistent (like watching driftwood come in from two smaller tributaries, into the main river, at 90 degrees).

I would copy my model here, except I'm still working on an odd, occasional deadlock using this 91 degree max angle inline conveyor trick (or, hack). Likely, it's some kind of interaction with the way in which the flowitems tuck into the mainline conveyor, and rotate as well.

Once I get it tweaked and working, I'll post it here.

Mike


0 Likes 0 ·
Mike Mayer avatar image Mike Mayer commented ·

Hi Regan,


I've attached my model with four different scenarios. Still having a bit of trouble, but I think it's close. It works best at run speed 1.0 (4.0 is too fast)


Far left scenario (red/blue disks) is how we've been doing it all along, using Pull RR if available. The problem is that the disks jump through the intersection, and also collide and mash together. Can make some minor tweaks, but that's about as good as we've been able to get it so far, using that intersection technique.


Far right scenario (purple/pink disks) is the default behavior when you attach a side conveyor at 90 degrees. The purple disks can only get onto the main conveyor when a longitudinal slot on the main conveyor is at least as wide as the diameter of the incoming purple disks (0.95 in this case). It works as it should, but there is no round robin to deal with the contention. And, downstream gaps form when a purple disk slides into the main conveyor.


Second from right (aqua/yellow disks) is the same as the purple/pink one, except I changed the side transfer from side transfer to an inline transfer by specifying a max angle of 91 degrees, thus forcing it into an inline transfer even though it's only still attached as a 90 degree side conveyor (turns out it works the same for any max value greater than 90). The result is a really nice, natural flow of the aqua disks onto the main conveyor, tucking-in right behind the yellow disks (if there's a big enough gap), thus creating no gaps downstream. Even though no RR behavior if there's contention at the T, it still looks a lot better than the default, where the purple disks have to sit and wait for a wide enough gap, thus causing gaps downstream. Not sure which is mechanically correct, since it can vary based on what kind of conveyor we are physically using. I only just discovered it while playing around the other day.


Finally we have your excellent solution second from left (green/orange disks). It uses the acquisition and release of restricted areas. It works quite well. Then, I also added the "TransferType_91-deg_Inline" transfer trick, where the side tee meets the mainline in that example. Doing this makes the RR interleaving of disks look really natural, and is by far the best visual choice. Except, it has a tendency to always eventually deadlock, not quite sure why. Sometimes it deadlocks right away, sometimes a bit further into the sim, but, it will lock up.


To help visualize what's going on I created a couple of posts, either will turn green to indicate which of the DP's acquired the restricted area (DP1_AquireRestrictedAreaMainline or DP2_AquireRestrictedAreaSide), and DP3_ReleaseRestrictedArea will turn both gray upon restricted area release.


NOTE: The thin orange panels are just used by me to get the DP's aligned in the Ortho view. They aren't part of the simulation, just props.


To further help, I created a yellow plane and put it at the intersection, flat, just under the rollers. It's supposed to turn yellow whenever the On Arrival triggers fire for either DP1_AquireRestrictedAreaMainline or DP2_AquireRestrictedAreaSide, and then disappear when the On Arrival trigger fires for DP3_ReleaseRestrictedArea.


It was working OK yesterday, but now if you go into the 3D view I see a floating oddball yellow plane there, which remains stationary as you rotate the perspective view. Strange.


Originally, to make that flat yellow plane appear/disappear, I used the code at the bottom of DP1_AquireRestrictedAreaMainline and DP2_AquireRestrictedAreaSide. I had to do it that way, since I was not able to get the "switch_hideshape(Model.find("RestrictedAreaPlane"),0)" command to work (that last parameter can be a 1 or 0 depending on hide/don't hide desired). You can see it's commented out in those two On Arrival triggers, and instead I simply change the value of the variable between 0 and 1. In any case, when it's supposed to disappear, I get the floating yellow plane, and when it's supposed to appear, I get nothing. It had been working OK, but not now.


So anyway, the orange/green disk merge method is very close to working, except 1) for the deadlocking at the T, and 2) the odd yellow plane artifact floating around the intersection, and not being able to control the visibility of that plane at the T intersection of that example, as the restricted area is acquired and released.


I am using FlexSim 24.0.1


Thank you.

RR_Conv_Test_Disks.fsm

0 Likes 0 ·
Regan Blackett avatar image Regan Blackett ♦ Mike Mayer commented ·

@Mike Mayer . I'm not sure why but it seems like using the side transfer with that 91 degree angle may be the cause of the gridlock. I've got a message out to the developers to see what could be going on.


My workaround though is to use a tiny curved conveyor to create actual inline transfers from the side conveyor to the main. I had to really play with the radius and the attach point between the curve section and the main section but it doesn't lock up and it still gives that nicer animation that I think you are looking for.

rr T intersection small curve.fsm

0 Likes 0 ·
Mike Mayer avatar image Mike Mayer Regan Blackett ♦ commented ·
That's pretty clever Regan, thanks for having a look.


I also wonder if I could simply attach the side conveyor at a slight angle to the main conveyor, i.e., such that it's feeding the mainline at somewhere between an 85 or 89 degree angle, yet specify 90 as the max angle in the transfer thus forcing it to be an inline transfer. I'll play with it.


Also, what do you make of that odd floating vertical yellow plane at the intersection? Do you see it on your side? It just floats there. It becomes invisible when the restricted area is acquired, and reappears when when the restricted area is released, just kind of floating in that intersection.


The way it's supposed to work, is that there's a flat square yellow plane resting just under the rollers in the intersection, and by default I make it not visible. When a disk enters the restricted area (having just been acquired), the flat plane yellow plane is supposed to become visible (On Arrival code) to visually indicate the restricted area is active (in addition to one of the posts turning green).

The idea is that the restricted area under the rollers of the main conveyor would have the yellow plane showing through the roller gaps whenever that restricted area has been acquired. Then goes invisible again after the restricted area is released - until the next arriving disk acquires the restricted area. Similar to the idea of a big yellow square outline appearing under a processor when it's awaiting an operator.

Like I say, the yellow plane idea had been working OK in an earlier model, but kind of went haywire on me in the most recent version.

Note that as you rotate the 3D view, that static yellow vertical plane does not move. I suspect there's some kind of geometry display quirk happening.

Thanks again,

Mike

0 Likes 0 ·
Show more comments

Write an Answer

Hint: Notify or tag a user in this post by typing @username.

Up to 12 attachments (including images) can be used with a maximum of 23.8 MiB each and 47.7 MiB total.