question

shanice.c avatar image
0 Likes"
shanice.c asked Eric M answered

Item Placement on task executer

I use a task executer to move boxes from Queue1 to buffer lifter.

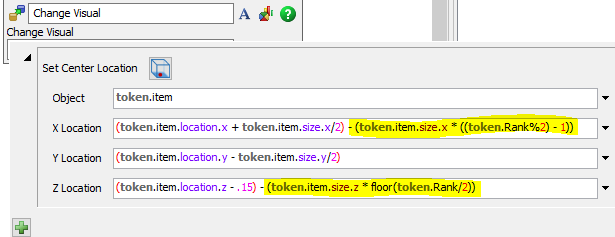
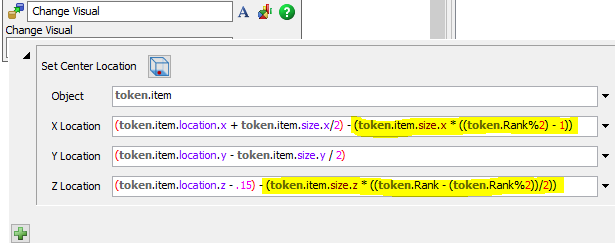
Is there any methods to change the item placement on task executer. Now 4 boxes stack vertically, but I need it to stack on cart like picture on right hand side.

1625755688736.png

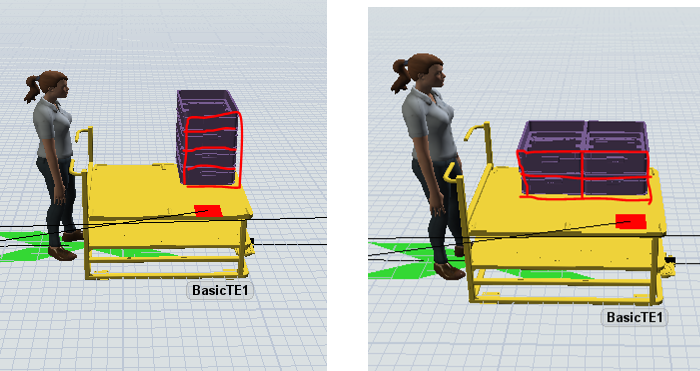
I also need to make cart drive into buffer lifter, and then the elevator can pick one box at a time from cart. Now I use Queue2 for temporary placement before entering elevator.

cart.fsm

FlexSim 20.1.3
task executeritem placement
1625755688736.png (169.7 KiB)
cart.fsm (4.9 MiB)
cart.fsm (4.9 MiB)
· 2
5 |100000

Up to 12 attachments (including images) can be used with a maximum of 23.8 MiB each and 47.7 MiB total.

Eric M avatar image Eric M commented ·

Would you mind imbedding your custom objects in the model? Currently the file doesn't can't find the shapes so no objects are appearing. To do this you can go to View>Media Files and then browse for your objects and click "Add."

0 Likes 0 ·
shanice.c avatar image shanice.c Eric M commented ·

Hi, @Eric M, Now I've followed your steps to add objects, but not sure if you can see them now. If objects still not appearing, can you simply use other task executer instead. Thank you for your support. cart (3).fsm

0 Likes 0 ·
cart-3.fsm (4.2 MiB)

1 Answer

·
Eric M avatar image
0 Likes"
Eric M answered

Hi @Fiona C, thanks for attaching those objects. I did this using process flow and a change visual activity. A token is created for each flowitem that gets loaded in the cart. That item is then given a label to say which rank it is in the cart (1,2,3,or 4). Then the change visual activity uses the original item's location, size, and rank to place it in the right position in the cart. Here's what change visual code looks like. I'll explain how it works below:

1626278188530.png

You can see at the top that the Change Visual right now is setting the center location of the item. The first part of the code in each of the positions is just setting the item back to where it was originally. The item.location command returns the position of one of the edges. Since this is setting the center location, we had to either add or subtract by half of the item size to get it in the right place (which is what the item.size command is doing). Also, for the Z location, the .15 was added because the items were originally floating over the cart.

The logic in yellow is how the items get placed either in the front stack or the rear stack. The X location of odd ranked (1,3) boxes would stay the same, and the even boxes (2,4) would shift one X length back. I used the fact that EvenNumber%2 = 0 and OddNumber%2 = 1. By subtracting 1, the Odd ranked boxes would have a result of 0 meaning they wouldn't be shifted. The Even ranked boxes would have a result of -1*XSize which is what we wanted.

The Z location works similarly. In terms of the Z size of the item, the 2nd box would need to move down 1 size, 4th box 2 sizes, 6th box 3 sizes, etc. For the odds, the 3rd box would need to move down 1 size, 5th 2 sizes, etc. The rank divided by 2 gets us there for the Evens, and the Odds just need to be rounded down (which is what the floor is doing). That gives us the proper scaling for how many times the z size we need to go down.

For the elevator transition, would hiding the queue work? If you go to the queue properties and click more visuals, you can uncheck the box "Show 3d Shape." Let me know if you have any questions.

cart-3_1.fsm


1626277669004.png (18.5 KiB)
1626278188530.png (18.2 KiB)
cart-3-1.fsm (4.2 MiB)
5 |100000

Up to 12 attachments (including images) can be used with a maximum of 23.8 MiB each and 47.7 MiB total.

Write an Answer

Hint: Notify or tag a user in this post by typing @username.

Up to 12 attachments (including images) can be used with a maximum of 23.8 MiB each and 47.7 MiB total.