question

Gasser Y avatar image
0 Likes"
Gasser Y asked Gasser Y commented

How to use the percentage option ?? How to build an inspection workstation ??

Good evening everybody,

Please, I need a detailed steps of the following, your help is highly highly appreciated:

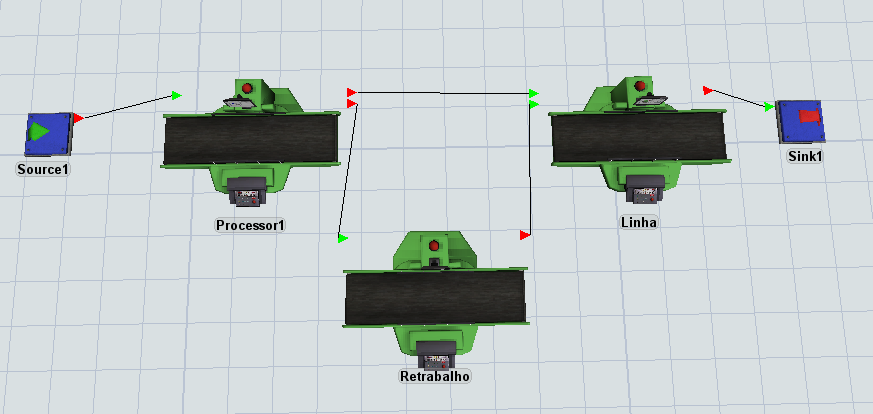
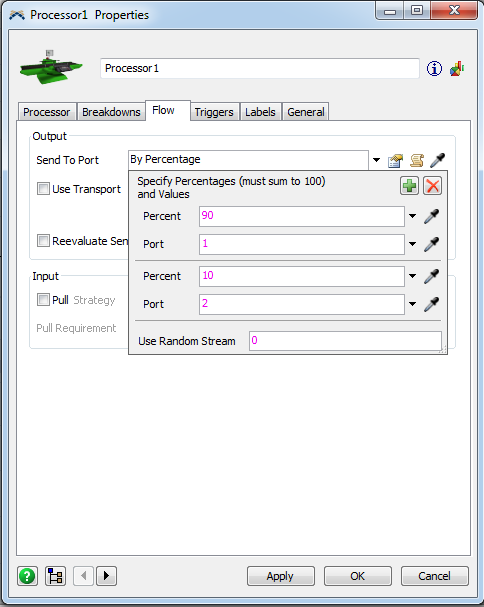
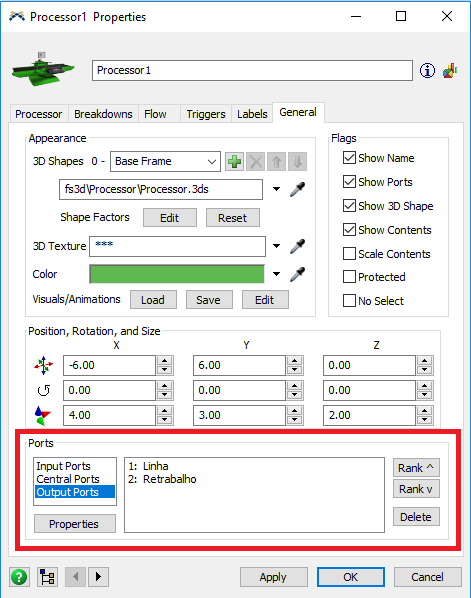
Is there any item that make the work of an inspection station?? Or in other words, how to modify the options of a "processor" using a percentage, that 90% of the inputs are defects-free and shall continue in Path1 of the assembly line, while the 10% remaining are parts-defective, and shall continue in a different path (for a rework station or something), then later the product joins back Path1 of the assembly line, and continues processing from a certain workstation ??

I hope you got my idea. Thank you so much in advance.

Choose One
reworkpercentageinspectionpartsdefectiveprocessoroptions
5 |100000

Up to 12 attachments (including images) can be used with a maximum of 23.8 MiB each and 47.7 MiB total.

Rodrigo Lamas avatar image
2 Likes"
Rodrigo Lamas answered Gasser Y commented

@Gasser Y You can use the processor object to do these steps, see the example below

rework-example.fsm

Using the Process Flow Tab Send to Port / Random / By Percentage / according the picture

I hope that this information can be helpfull! Regards.


flow.png (31.7 KiB)
model.png (81.0 KiB)
rework-example.fsm (19.7 KiB)
· 2
5 |100000

Up to 12 attachments (including images) can be used with a maximum of 23.8 MiB each and 47.7 MiB total.

Gasser Y avatar image Gasser Y commented ·

@Rodrigo Lamas Well, this is very helpful. I just wonder; which workstation is port1 and which is port2 ?? And are they assigned automatically, or how do i control this ??

But anyways, thank you so much for your help!

0 Likes 0 ·
Joerg Vogel avatar image Joerg Vogel Gasser Y commented ·

@administrators, @Matthew Gillespie, @Ben Wilson, can you move this question as a new question with the answer of Sebastian.

Thanks, Jörg

0 Likes 0 ·
Sebastian Hemmann avatar image
1 Like"
Sebastian Hemmann answered Gasser Y commented

@Gasser Y With port in the "Send to Port" Strategy FlexSim assignes the Output port of the actual object. So with adding "A" Connections you can refer directly to another object.

To find out what port ist connected to what object you can either follow the Connection, press the "V" Button (for Inputs and Outputs, "C" for Centerports) and click on an object, or have a look in the Generals Tab of the GUI.

· 3
5 |100000

Up to 12 attachments (including images) can be used with a maximum of 23.8 MiB each and 47.7 MiB total.

Gasser Y avatar image Gasser Y commented ·

@sebastian.hemmann I am sorry, but I don't get it.

Let me put it this way;

In the image provided by Rodrigo Lamass' answer, The flow of the workstation "Processor1" is controlled by percentage, 90% goes to Port1, and 10% goes to Port2. And in the assembly line, "Processor1" is the supplier to workstations "Retrabalho" and "Linha".

So, my question is: Which workstation (Retrabalho/Linha) is supplied by the 90% (Port1), and which is supplied by the 10% (Port2) ?? How do I know, or how do I assigned the ports to the workstations ??

0 Likes 0 ·
Sebastian Hemmann avatar image Sebastian Hemmann Gasser Y commented ·
@Gasser Y

as you can see in the Picture of Rodrigo Lamass answer the "Processor1" has 1 Input (small green triangle on the left upper Corner) from "Source1" and 2 Outputs (2 small red triangles on the right upper Corner) to "Linha" and "Retrabalho". The Count of these Connections is in order of their creation and so the Connection to "Linha" is Port 1.

If you use the "V" Button or have a look into the General Tab there also a port number is writen! If you want to Change the port numbers, you can do it be erase all Connections and add them again in the new order you like, or by directly Change the rank in General Tab.

0 Likes 0 ·
portconnection.png (30.1 KiB)
Gasser Y avatar image Gasser Y commented ·
@sebastian.hemmann


Super! Now I get it. Thank you so so much for your help. :)

Best Regards.

0 Likes 0 ·

Write an Answer

Hint: Notify or tag a user in this post by typing @username.

Up to 12 attachments (including images) can be used with a maximum of 23.8 MiB each and 47.7 MiB total.