Using Mixamo Fuse, Mixamo, and (optionally) 3ds Max, you can create animated characters for use with FlexSim.
For modifying the existing operators' animations, see Adding More People Animations From Mixamo
Character Creation
You can customize a character’s look using Mixamo Fuse:
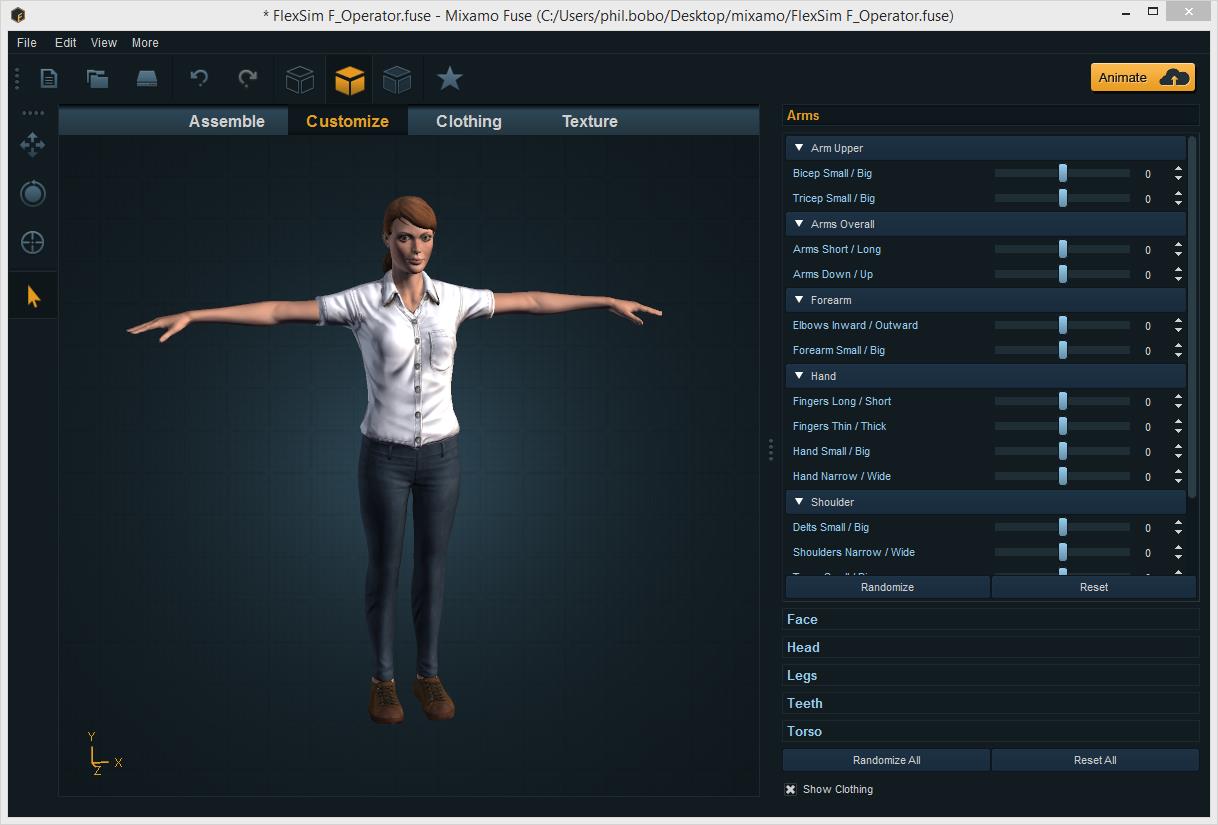
After creating the character, you can save your character as a .fuse file in case you want to edit it again later in Mixamo Fuse.
Character Rigging
From Mixamo Fuse, you can press the Animate button in the upper-right corner to upload the character to Mixamo’s website to apply animations. You will need to log in with a Mixamo account.
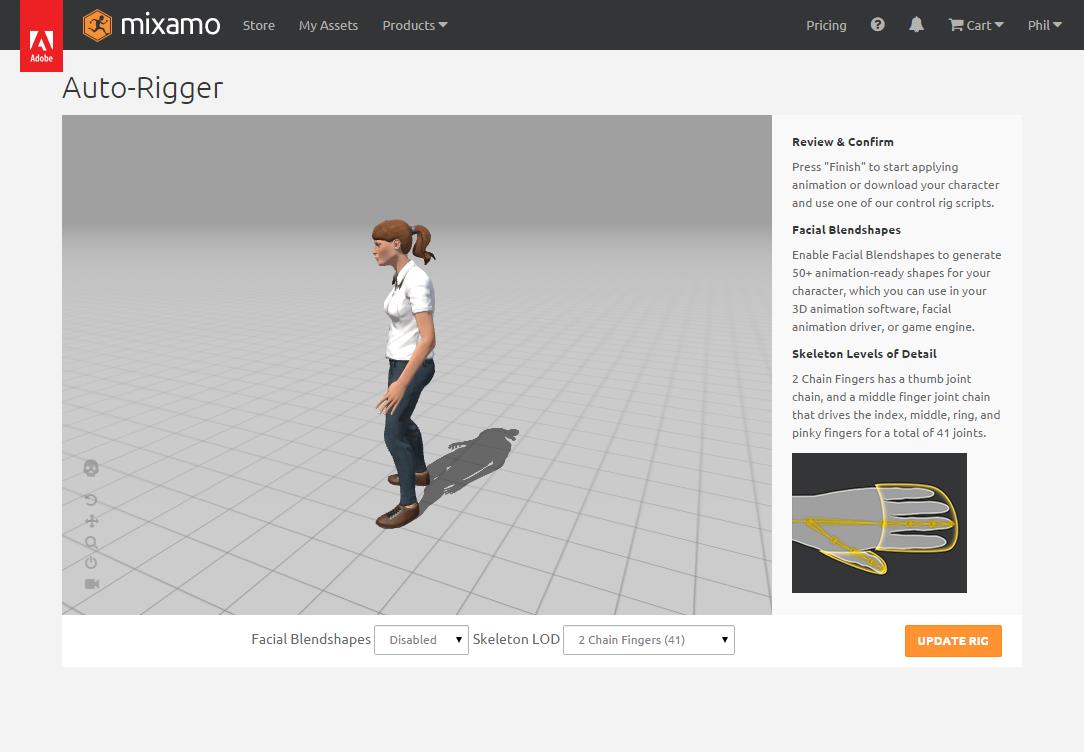
You will be presented with the Mixamo Auto-Rigger. After a few moments, your character will appear in a view with a default animation applied.
Choose whether to enable facial blendshapes and select the appropriate level of detail for the skeleton, such as 2 Chain Fingers, and then press Update Rig. The auto-rigger will reapply and the view will be updated with the newly rigged character.
If the settings are good for your needs, press the Finish button.
Character Animating
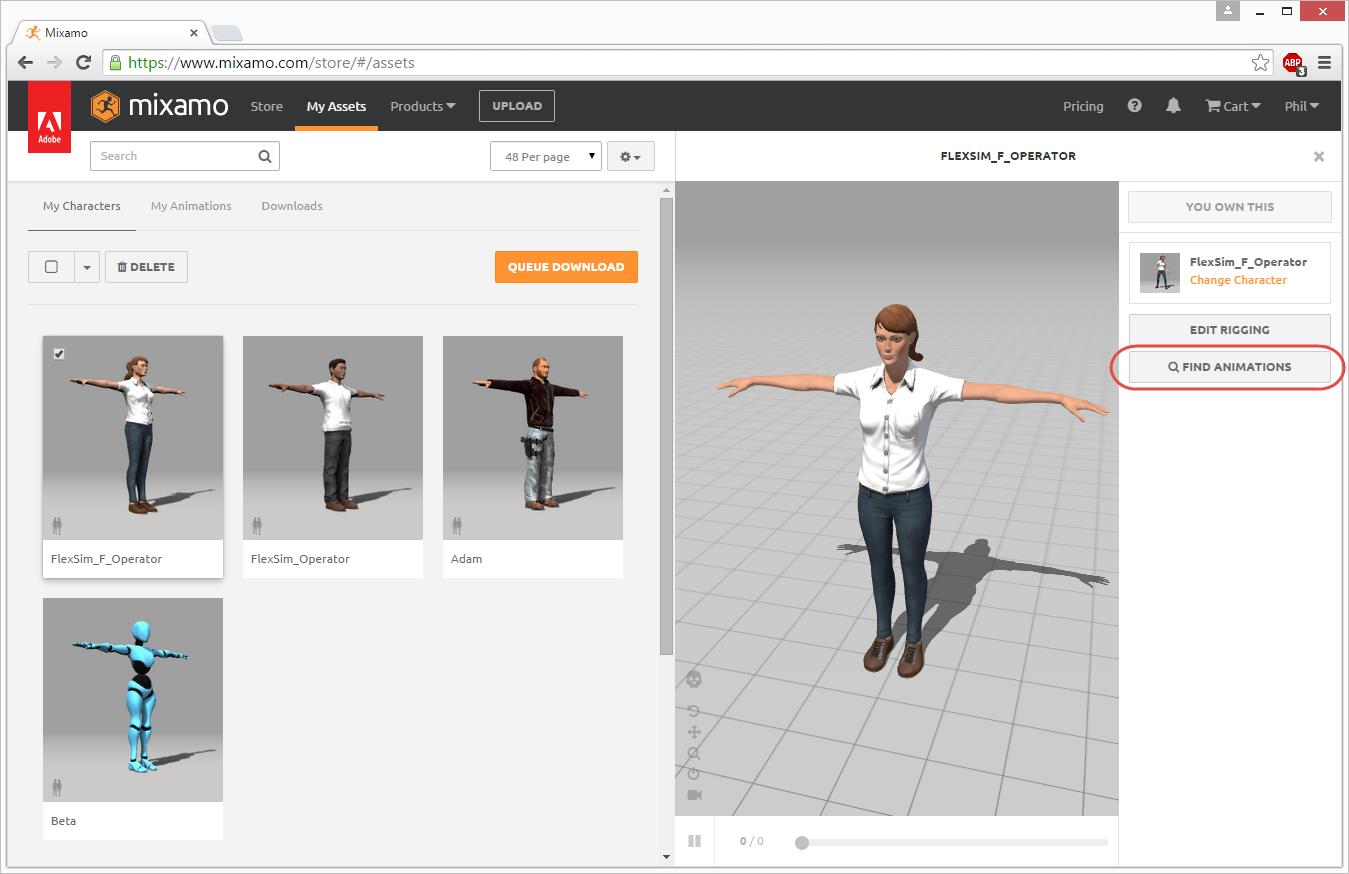
Once the character is rigged, you can select it on the Mixamo website and press Find Animations to find animations to apply to the character.
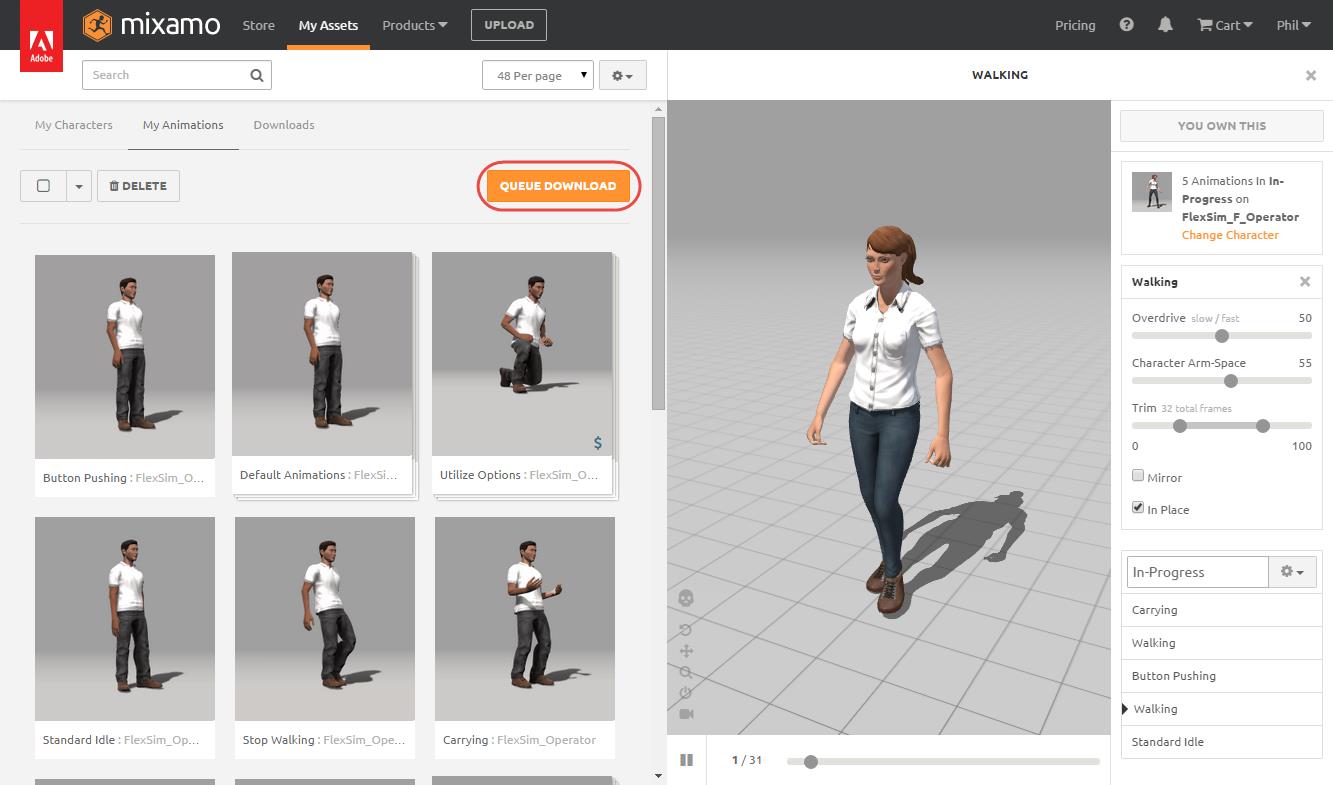
You can search for animations and add them to packs. For each animation, you can adjust various parameters to fit your character to that animation better.

Exporting the Character and Animations
Once you have applied and customized animations for your character, you can add them to the Cart and checkout in order to have them available for download.
After checking out, you can select an animation or animation pack to download on the My Animations page. You can apply the same animation sets to different characters using the Change Character button after selecting the animation set.
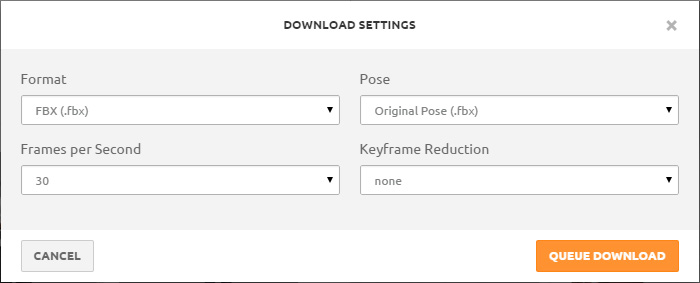
Press the Queue Download button to tell the Mixamo server to create the files for download.
You want to use the FBX format so that we can edit it with 3ds Max. The pose can probably be T-Pose or Original because the Original is probably a T-Pose anyway. I use 30 Frames per Second for consistency and ease of timing animations. Keyframe Reduction didn’t seem to do anything in my tests, and you can do it yourself with more control in 3ds Max so I use “none.”
If you exported multiple animations, the output will contain one fbx file that is the character shape and several other fbx files that contain only animation data for each animation.
(Update) Important Note:
Starting with FlexSim 2017 Update 2, the rest of the steps in this document are no longer necessary.
FlexSim 17.2 added support for embedded textures, specular maps, and gloss maps that fix the material issues directly without modification in 3ds Max.
FlexSim 17.2 also added support for assigning animations to a shape from multiple files, so you can import the mixamo output files directly without having to merge all the animations into a single file.
The following steps can be used if you want to optimize or otherwise modify the shape files, but are no longer required.
Preparing the Character using 3ds Max
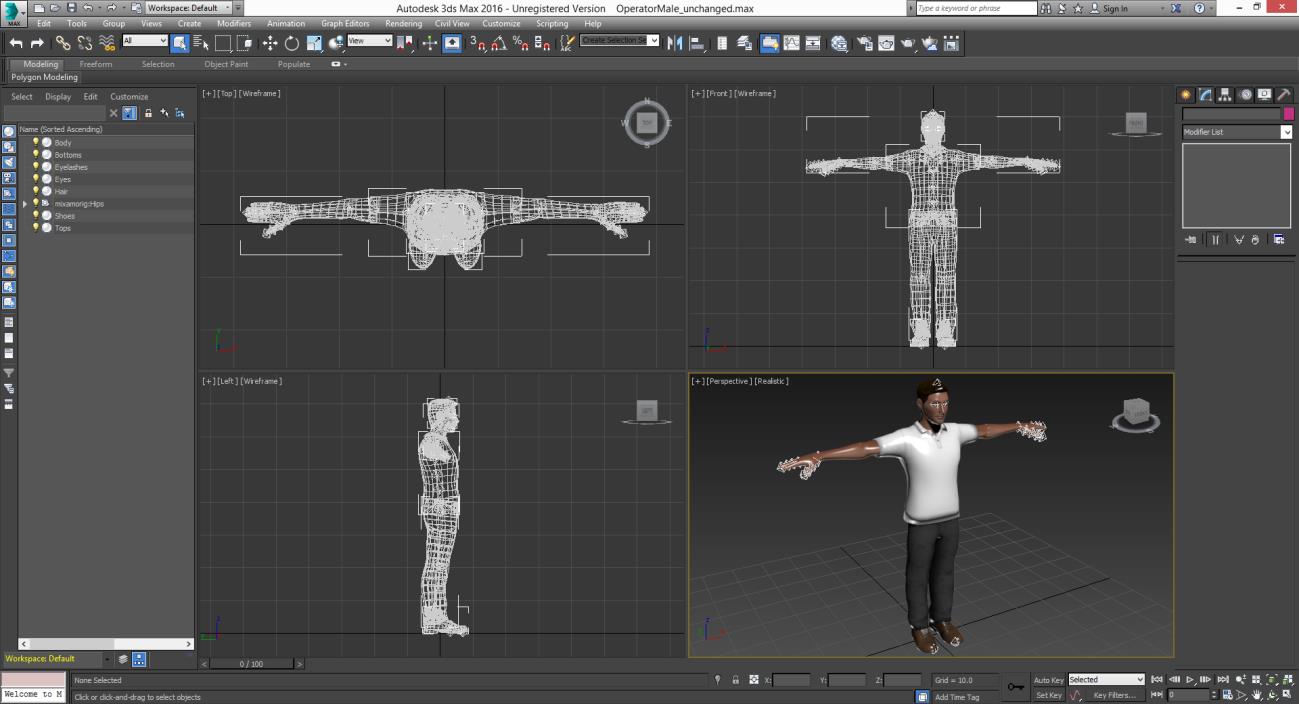
Import the character shape .fbx file into 3ds Max and save the file as a .max file. You will want to resave as a .max file at different points with different file names as you progress so that you can easily revert back to a previously known working point if something messes up.
The FBX Import window will show you lots of options you can modify. The defaults seemed to work fine. I tried messing with the “Units” scale factor and file unit conversions, but I was unable to find any options that improved the scaling in FlexSim. Ultimately, I found it best to just use Automatic and sort out the units myself using FlexSim’s shape factors.
Export the file as fbx and bring it into FlexSim to see how it looks. Again, the default options seem to work fine.
In FlexSim, the size will probably be 100x too big (no matter what “unit conversion” options I seemed to set in the import/export options). Resize the character to be 100x smaller.
Fixing the Materials in 3ds Max
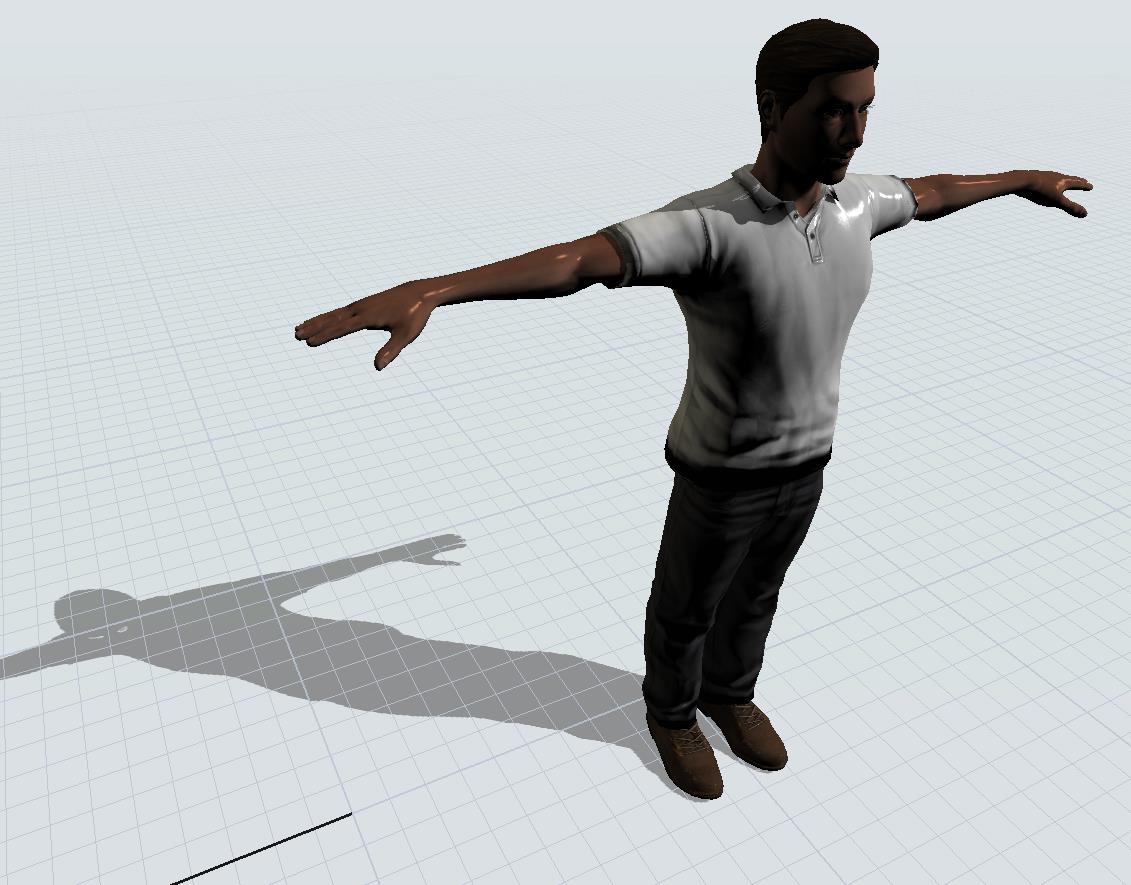
When you first bring in a Mixamo Fuse character into FlexSim, it will probably look shiny and dark. That can be fixed in 3ds Max.
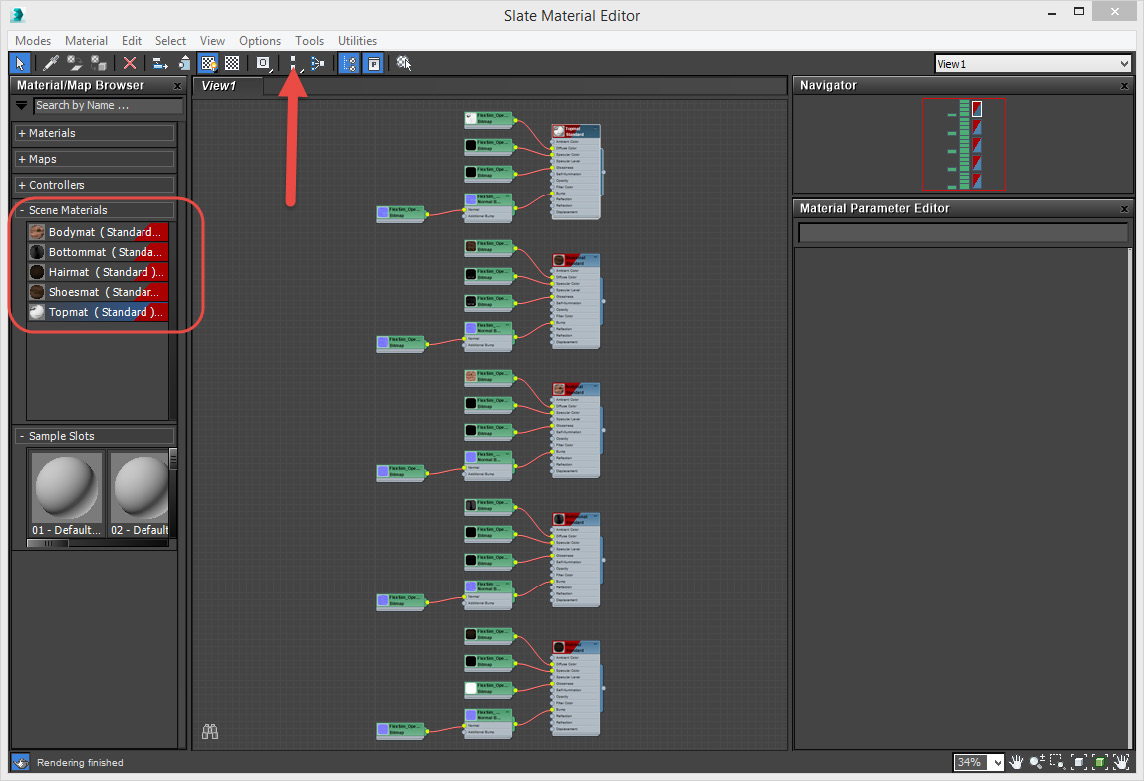
Open the Material Editor using the  button

Double-click each material in the list of Scene Materials on the left to add it to the middle view for editing.
Press the “Lay Out All – Vertical” button  to arrange the nodes nicely in the middle view.
When you imported the .fbx file, 3ds Max should have automatically unpacked its textures into a directory called CharacterFileName.fbm. When you double-click on a texture node in the Material Editor view, you should be able to see and edit the path where it is referencing each texture in the Material Parameter Editor pane on the right.

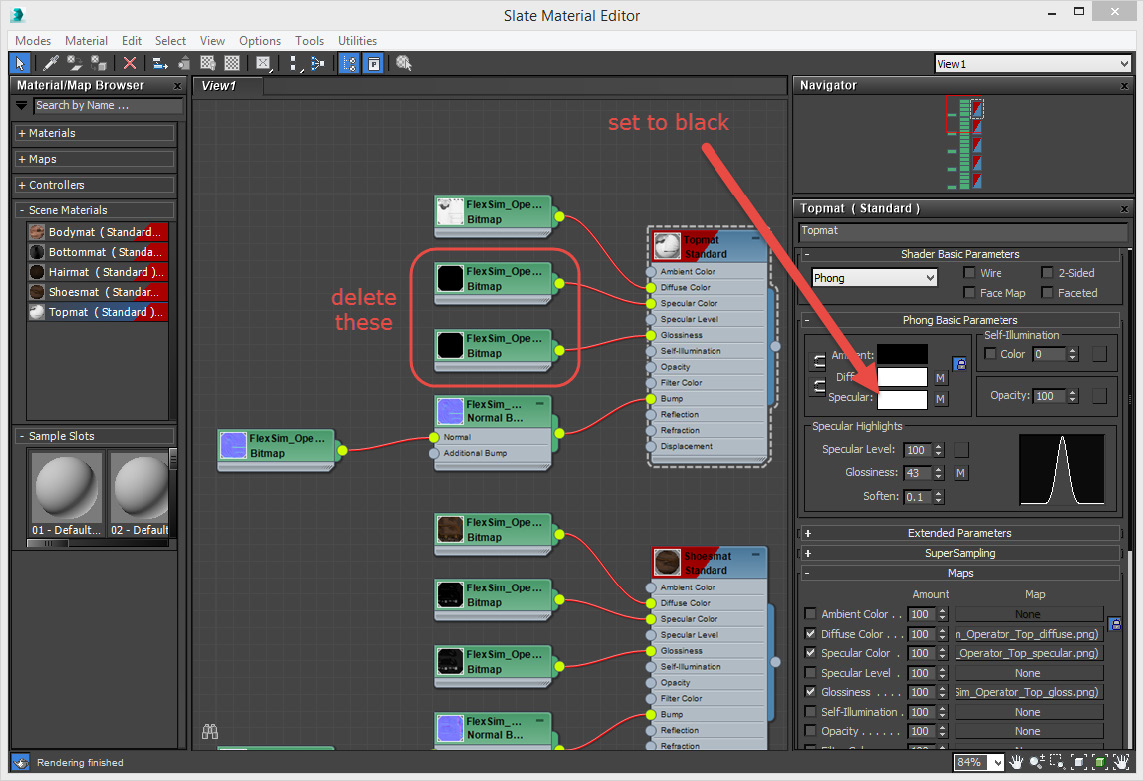
Removing the shininess
Each material has Ambient, Diffuse and Specular colors, in addition to any textures that are mapped to various channels.
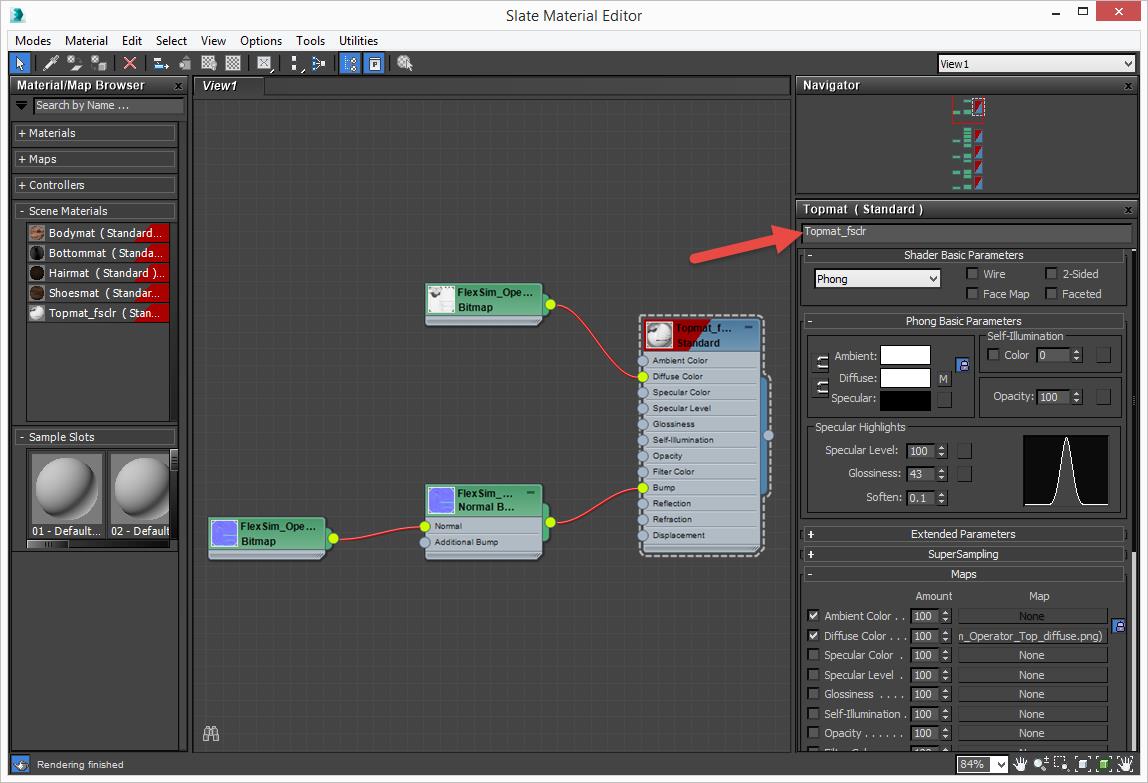
The operator is shiny everywhere because each material’s Specular color is set to White and their specular maps are mostly black. Since FlexSim doesn’t currently read specular maps and gloss maps, the white specular color is being applied everywhere instead of the black color from the specular maps. To fix it, click each specular map and gloss map in the center view and delete them with the Delete key. Then double-click on each main material and set its specular color to black to turn off the shininess.
Save the .max file with a new name, and re-export the .fbx file to test it in FlexSim. The shininess should be gone.
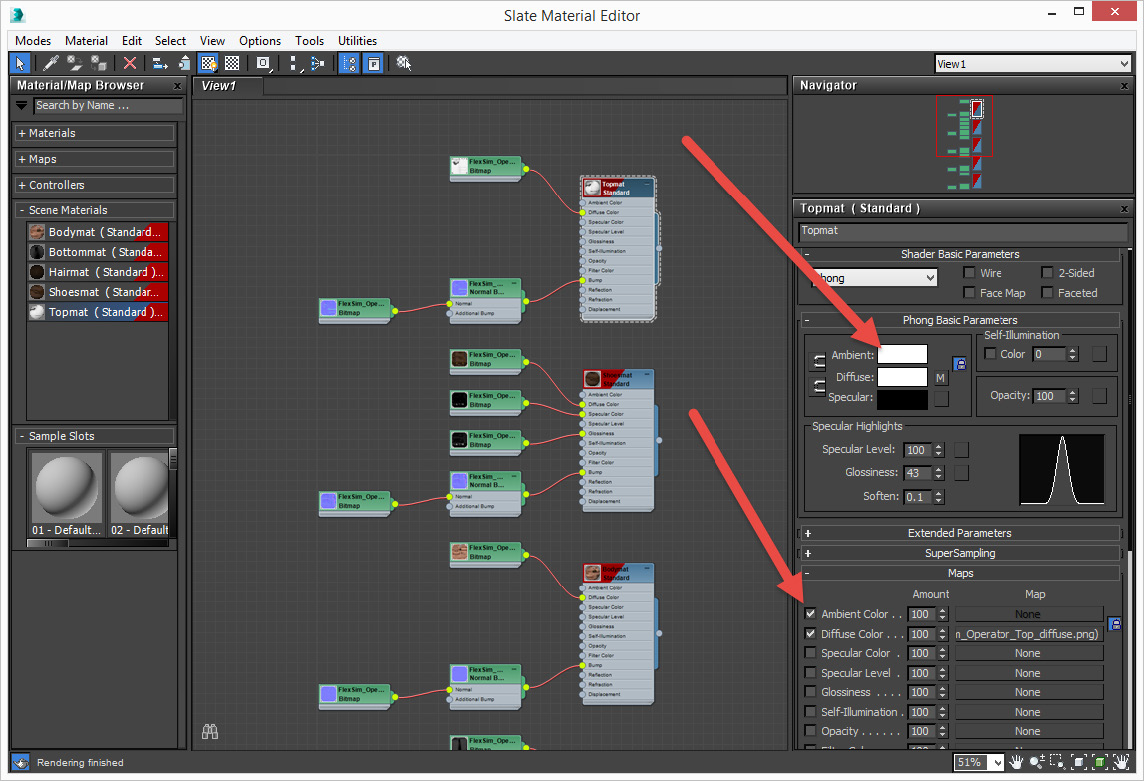
Brightening the darkness
FlexSim uses Assimp to read fbx files. Assimp’s fbx importer is setting a default Ambient color value of dark gray to the materials instead of leaving it off. This is why the character looks darker than he should. To fix it, we can simply specify an ambient color of white on each material.
For each material, set the ambient color to white and check the Ambient Color box under Maps:
Save the .max file with a new name, and re-export the .fbx file to test it in FlexSim. The darkness should be fixed.
Setting local texture paths
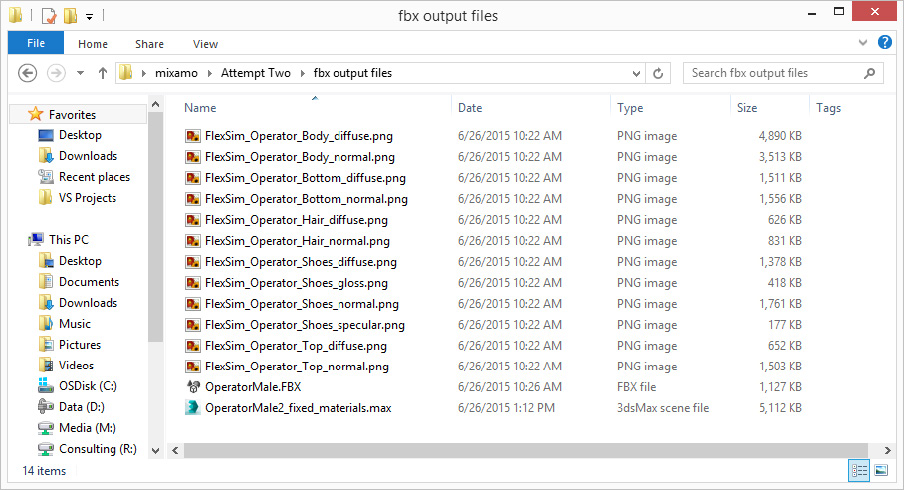
Based on the procedure above, the texture paths are likely to be absolute paths when you export the fbx file. You can fix that by saving the .max file, the .fbx file, and the textures all in the same directory.
In Windows Explorer, copy all the useful textures from the CharacterName.fbm directory into the same directory where you have been exporting the .fbx file.
Then also save your .max to that same directory.
Once everything is in the same directory, you can reselect the texture file paths for each material so that they are pointing at these files instead of the other files. Then, when you export the fbx file, each texture’s path will be relative so you can copy all the necessary files onto any computer and use them correctly.
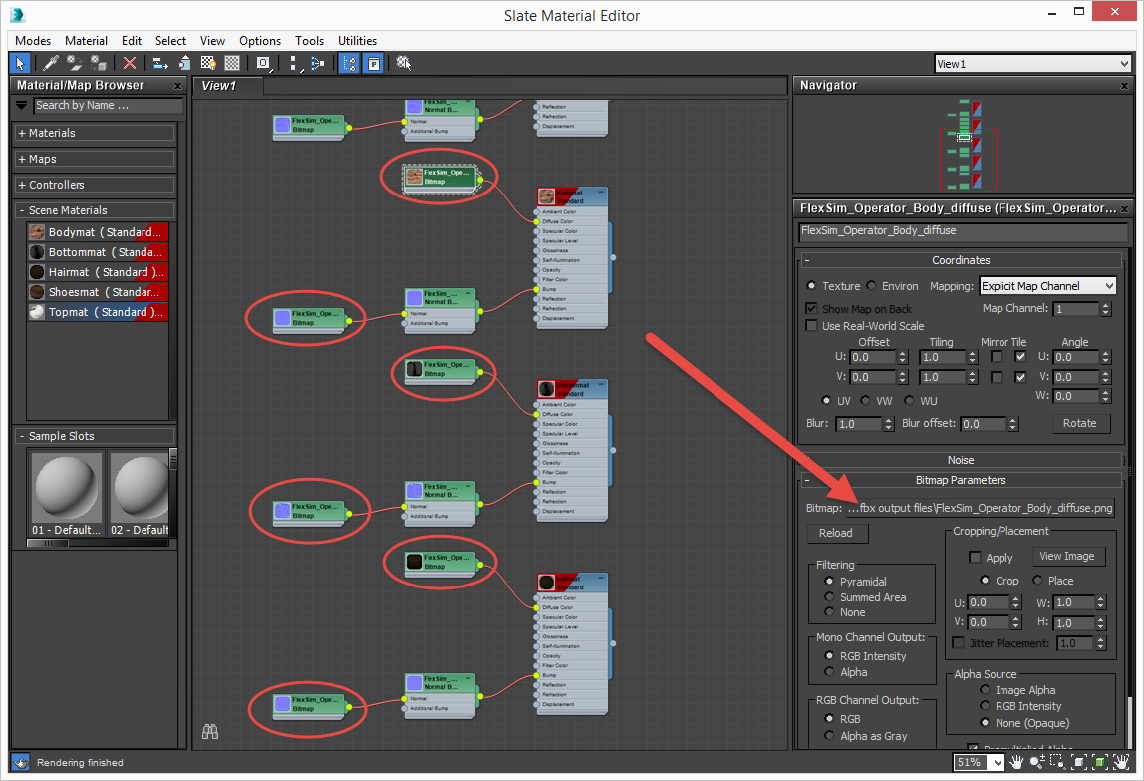
After changing all the materials, export the fbx file again. You should be able to copy the fbx file and all its textures into a directory on a different machine and have them display properly.
Save your .max file with all the updated materials.
Making part of the object change color
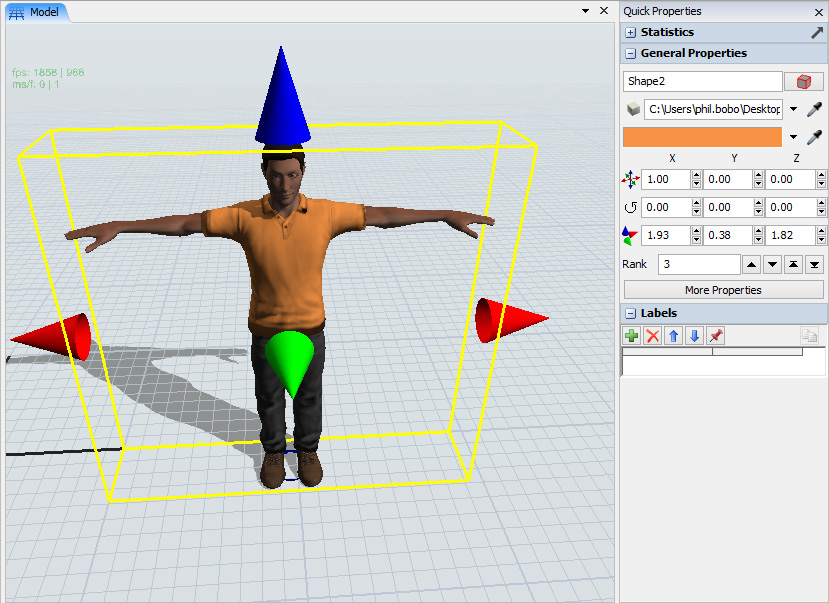
To make a material show the FlexSim color, append _fsclr to its name in 3ds Max:
Configuring Animations
With the character loaded, you can import the fbx files with just animation data, and it will automatically apply that data to the shape.
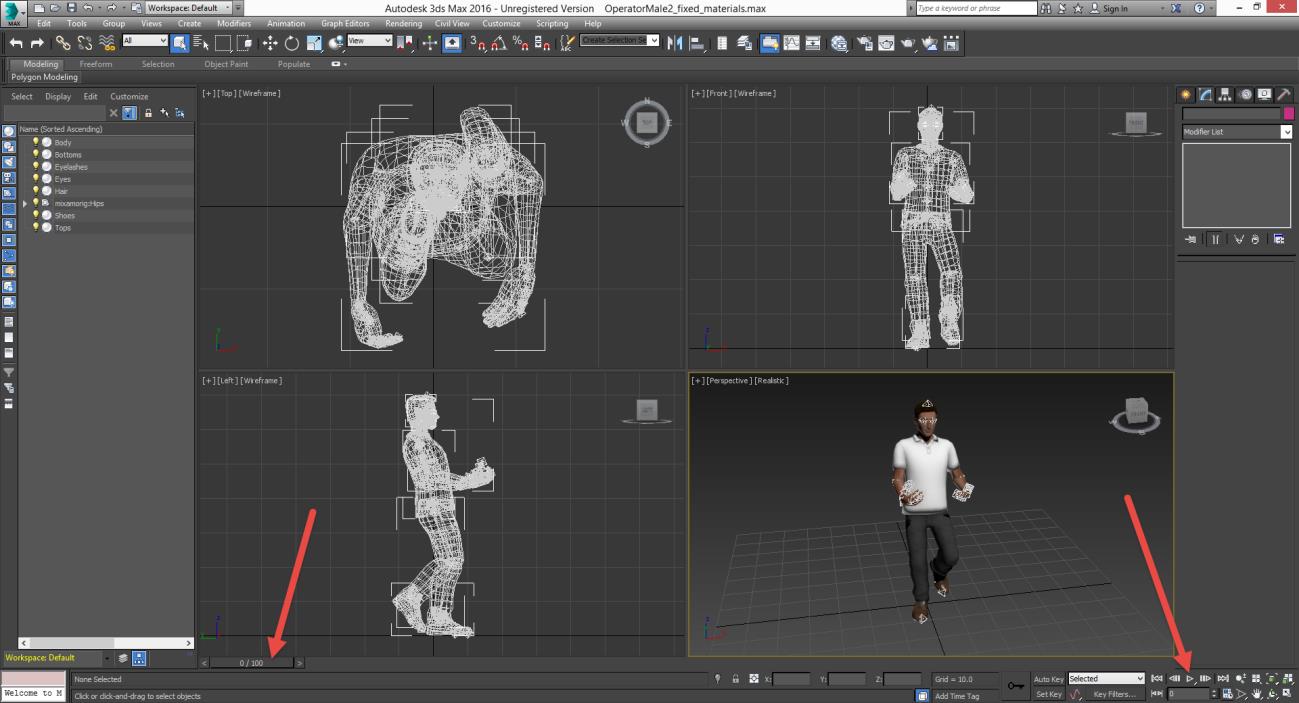
The slider at the bottom controls the currently applied keyframe.
The buttons in the bottom corner play the animation, pause, or step between keyframes.
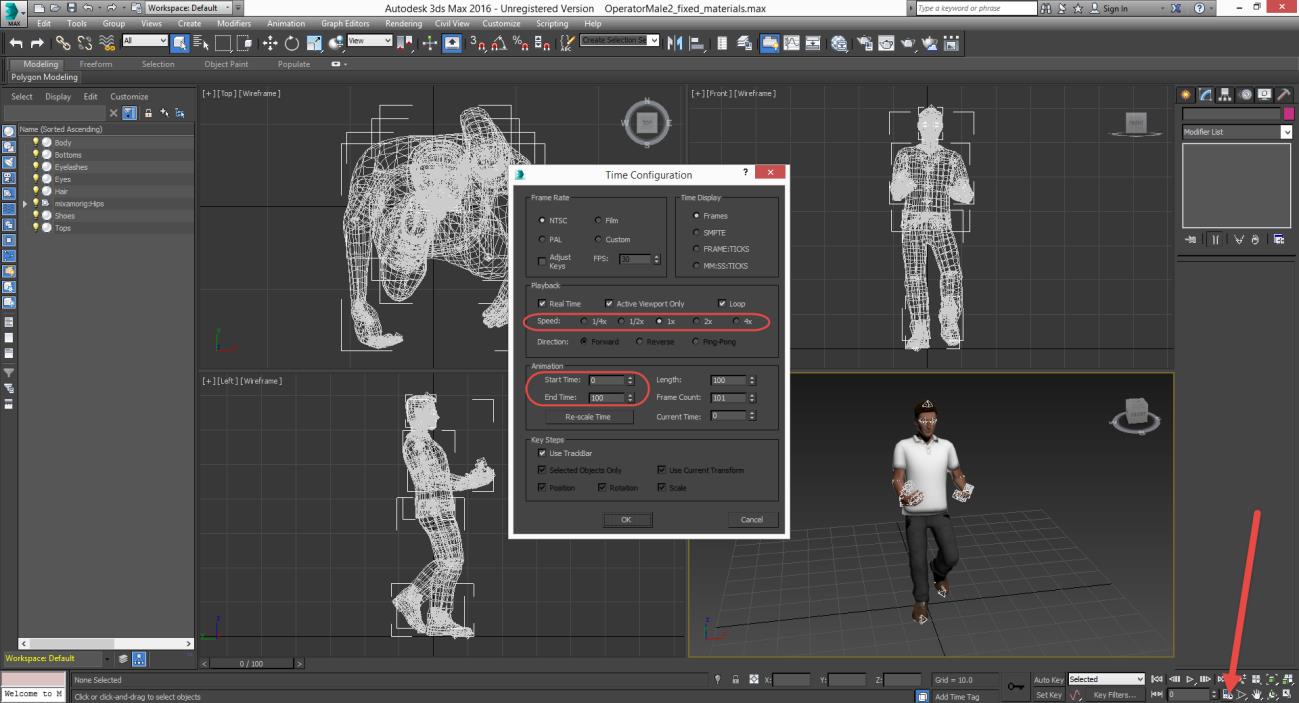
Animation data can be stored beyond the relevant range. You can open the Time Configuration dialog by pressing the  button in the bottom corner. In that dialog, you can specify the speed of the playback and set a Start Time (keyframe number) and End Time for the animation you want to see in the viewport when you play. This dialog is only changing the playback options in the software; the actual data outside the specified range is still preserved. You may need to adjust these values as you import/modify/combine animations into one Timeline.
Keyframes
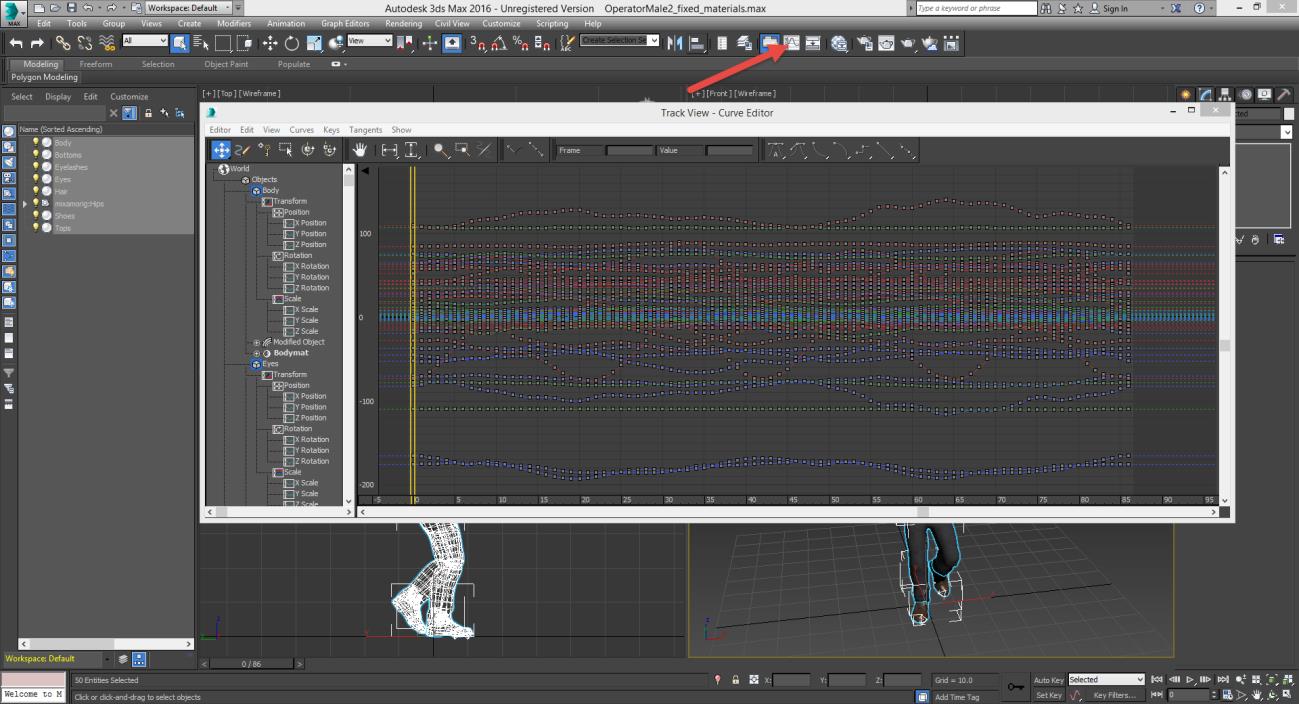
If you push the  button on the top toolbar, it will open the Track View – Curve Editor. You can edit and modify Keyframes through this view.
Click in the left pane and press Ctrl-A to select everything in the model. You should see keyframes appear if you have animation data loaded.
Sometimes this window doesn’t refresh correctly and you can’t find keyframes. You can try closing it and reopening it, or pressing the  and
and  buttons to re-center the view on the keyframes in the configured time range. To edit the animations, you need to be able to see the keyframes in this view.
You can drag the current frame by dragging the yellow bar around.
You can zoom by scrolling the mouse wheel. Ctrl-mouse wheel will zoom the timeline (X-axis) without zooming the key values (Y-axis).
You can select keyframes by dragging a rectangle around them.
You can delete selected keyframes with the Delete key.
You can move keyframes by dragging them. If you hold Ctrl while dragging them, then it will force the movement to be only along the X-axis and not along the Y-axis so that you don’t actually edit the keyframe’s values, just its time.
You can duplicate keyframes by holding Shift and dragging them. Again, holding Ctrl will prevent the new keyframes’ values from shifting by holding the Y-axis still.
You can scale keyframes by selecting them, putting the key keyframe indicator on the first keyframe in the selection, picking the menu option Edit > Transform Tools > Scale Keys Tool, and then clicking and dragging on one of the selected keyframes to scale all of the selected keyframes towards the yellow bar. This can be helpful to sync the timing of animations, such as walking empty vs. walking loaded.
Preparing Animations for Merging
When you load an animation into the file, the Track View – Curve Editor will show you the individual components that have keyframe animations. Different animations may affect different components and the interpolation of transformation information between keyframes may get messed up when you merge different animations that affect different components together into one timeline. To fix this, you can stamp a keyframe at the beginning and end of each animation that stores each component’s position at that point. You can also duplicate the first and the last keyframes to make it easier to specify perfectly-repeating animation clips in FlexSim later.
Stamp a keyframe by moving the current frame (yellow line) to the keyframe you want. Then select all within the Track View – Curve Editor to select every component. Finally, press the Set Keys button ( ) at the bottom of the main 3ds Max window to store each component’s value as a keyframe.
Duplicate keyframes by holding Shift and dragging them. Also holding Ctrl will prevent the new keyframes’ values from shifting by holding the Y-axis still.
Merging Multiple Animations into One File
To merge multiple animations into one file, you need the export each of the animations as an animation file (XML Animation File (*.xaf)). Then you can import each of these animations into a specific range of keyframes in the timeline.
From the .max file without any animations loaded, import one of the fbx animation files. It will automatically apply it to the shape. Click in the Perspective view and press Ctrl-A to select everything. Then prepare the animation using the information above. Lastly, select the menu option Animation > Save Animation to save the animation as an XML Animation File (*.xaf). Reload the .max file without any animations and repeat this process for each animation you want to merge.
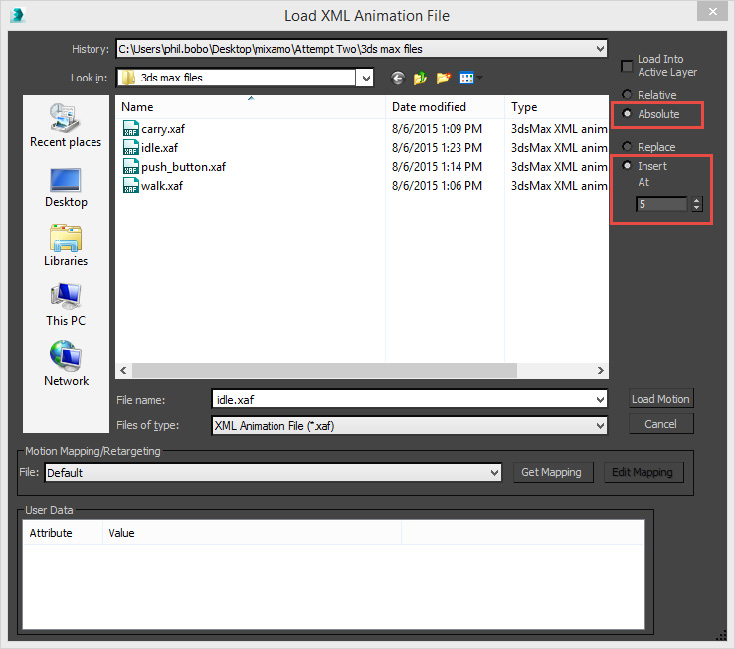
Reload the .max file without any animations loaded. Click in the Perspective view and press Ctrl-A to select everything. Then select the menu option Animation > Load Animation to load an animation into the timeline. On the right side of the Load XML Animation File dialog, you can specify the keyframe number at which the animation should be inserted. Do not insert the animation at keyframe 0; make sure that keyframe 0 is the bind T-pose. This will be important later if you want to edit the mesh without breaking the skeletal rigging. You also need to be sure to specify Absolute and not Relative. Select the animation you want to import, specify the keyframe you want to insert at, and then press Load Motion to load the keyframes into the animation. Do this for each animation file you want to merge. Use the Track View – Curve Editor to determine the keyframe at which to insert each subsequent animation.
Save your .max file with all the merged animations to a new file.
Modifying the Mesh without Breaking the Rigging
Sometimes you may want to modify the mesh after you have applied animations. I can’t guarantee that this always works perfectly, but there is a way to make some tweaks even after animations have been applied.
Before trying to edit a skinned mesh, be sure to save your work so you can revert back to a clean state if something don’t work correctly.
First, you need to be sure that the bind pose is frame 0 and that you are set to frame 0 on the timeline.
Second, click on a mesh in the scene and click on the Modifiers tab. You will probably see an Editable Poly with a Skin modifier applied.
If you click on the Skin modifier and expand the Advanced Parameters, you will see an Always Deform checkbox.
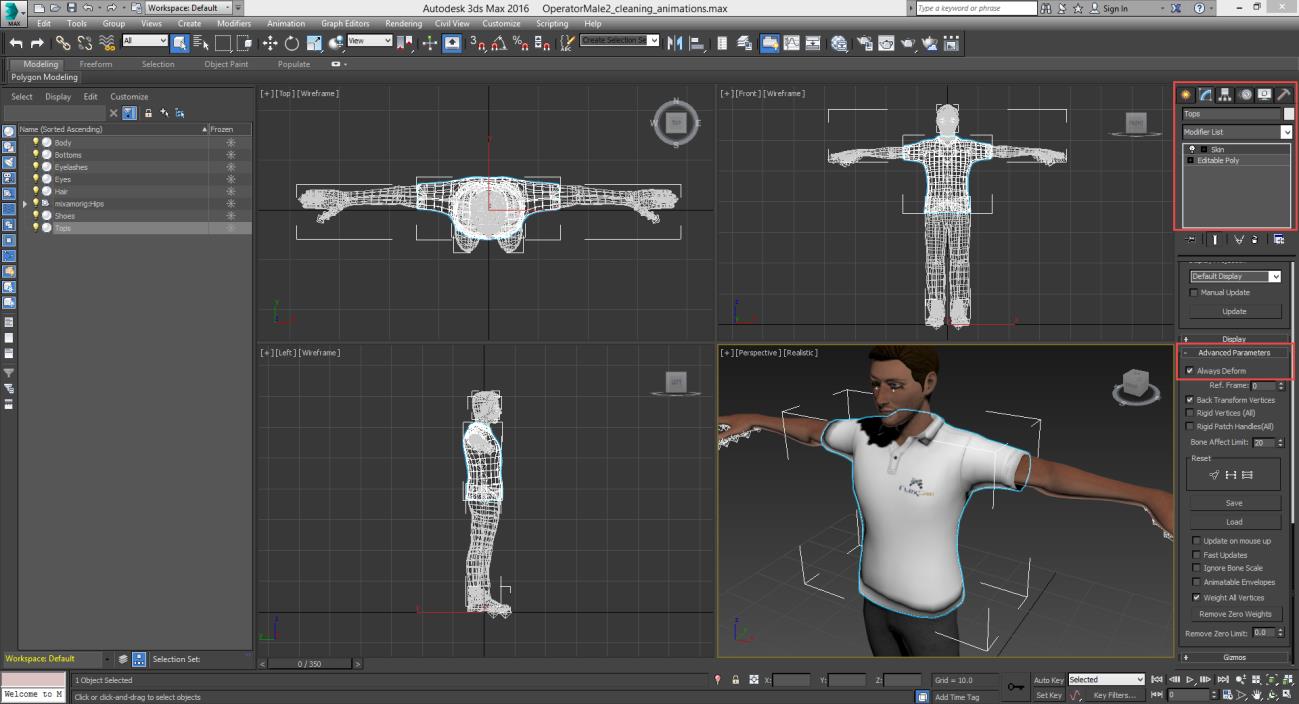
If you clear the Always Deform box, you can then click on the Editable Poly and modify it. You then need to recheck the Always Deform box on the Skin modifier once you are done making edits. Ensure that your animations still work after making edits.
In my tests with the operator shape above, when I cleared Always Deform, the mesh moved up slightly. This made the Tops mesh not line up correctly with the Body mesh. To fix that, I cleared and immediately checked Always Deform for each mesh (each mesh then moved up the same amount). Then I verified that the animations still worked and that the arms still lined up correctly with the shirt.
Reducing Polygon Count
3ds Max has features for reducing the polygon count of an object. You can apply these modifiers without breaking the rigging by following certain steps.
You can display the polygon count of your shape by clicking in the Perspective view and pressing the 7 key on the keyboard.
As stated above, before modifying the mesh, clear Always Deform on the Skin modifier.
To reduce the polygon count, you can use the ProOptimizer modifier. After clearing Always Deform, click on the Editable Poly and then select ProOptimizer from the Modifier List to add it to the stack between the Editable Poly and the Skin modifiers.
In the Optimization Options, be sure to check Keep Textures. Then press the Calculate button. Then you can specify a Vertex % and it will start to remove vertices from your mesh.
After applying the ProOptimizer modifier, the normals on your mesh might be messed up. You can recalculate the normals based on a crease angle using the Smooth modifier. Apply the Smooth modifier after the ProOptimizer and before the Skin modifier. Check the Auto Smooth box and specify a Threshold. You can use a value of 89 to get a very smooth surface, only applying a crease to angles that are greater than 89 degrees.
After making these changes, be sure to recheck Always Deform on the Skin modifier, and test your animation to make sure the rigging is all still working properly.
