question

Felipe P2 avatar image
0 Likes"
Felipe P2 asked Felipe P2 answered

How can I make the task executer always load and go?

prueba-avg.fsm

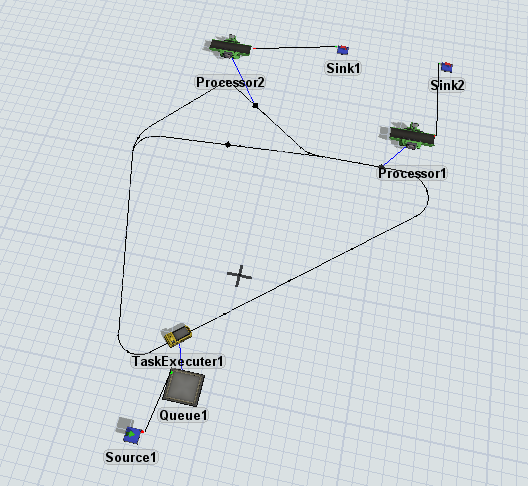
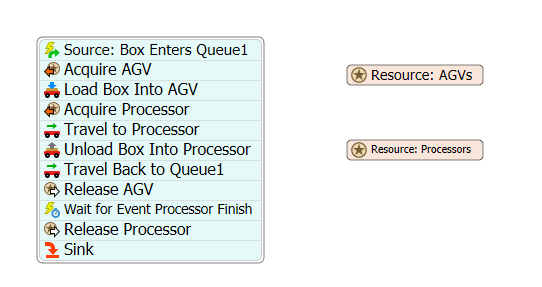
Hello, I built this model in which three task executers pick items from a queue (connected to a source) and deliver the items in two different processors. As I built it, the task executers prioritize Processor 1, and if this one is not available goes and delivers the item in Processor 2.

Right now, the task executer returns to the control point connected to the queue and waits for any of the processors to finish until it starts loading the item from the queue. I want the task executer to load the item from the queue as soon as possible, no matter the processors finished or not. Also, when the item is loaded, i want the task executer to go to the control point connected to Processor 1 and wait there for the next available Processor, and when any of the processors becomes available, goes and delivers the item there.

I would appreciate if someone can provide some help for this issue.

Regards!

FlexSim 19.1.0
agv networkmany processors
prueba-avg.fsm (39.6 KiB)
5 |100000

Up to 12 attachments (including images) can be used with a maximum of 23.8 MiB each and 47.7 MiB total.

Benjamin W2 avatar image
1 Like"
Benjamin W2 answered Benjamin W2 edited

The best way to accomplish this is using process flow.

Process Flow Setup
  1. Delete all port connections from Queue1 to the processors
  2. Delete the dispatcher
  3. Add all Task Executers to a group (I called mine "AGVs")
  4. Click on process flow and add activities so it looks like this:
Configuring Process Flow
  1. Click on Resource: AGVs to configure it. Underneath Reference select the drop down arrow. Hover over "groups" and select "AGVs".
  2. Repeat step 1 for Resource: Processors, except select the group "Processors" instead.
  3. Open Source: Box Enters Queue1.
    1. Underneath Object click the sampling tool, then click on Queue1 in the 3D model. In the drop-down list, select "Queue1: On Entry".
    2. Underneath Label Assignment/Match Value, type "box" underneath "Label Name or Value" for the row "Entering Item". Underneath "Operation", type "assign". Note, this will assign the entering box to this token.
  4. Click the red exclamation mark next to Acquire AGV. Then click on Resource: AGVs. This will link the acquire resource to the AGV group.
    1. Open the Acquire AGV, settings. Underneath Assign to Label, type "token.AGV". This will assign the acquired AGV to the token.
  5. Select the Load Box Into AGV and open its properties.
    1. Underneath Executer/Task Sequence type "token.AGV".
    2. Underneath Item type "token.box".
  6. Select Travel to CP4
    1. Underneath Executer/Task Sequence type "token.AGV"
    2. Underneath Destination, click the sampling tool and select the control point where you would like the Task Executer to wait for an available processor.
  7. Click the red exclamation mark next to Acquire Processor. Then click on Resource: Processors. This will link the acquire resource to the Processor group.
    1. Open the Acquire Processor, settings. Underneath Assign to Label, type "token.processor". This will assign the aquired processor to the token.
  8. Select Travel to Processor to edit it's properties.
    1. Underneath Executer/Task Sequence type "token.AGV"
    2. Underneath Destination type "token.processor"
  9. Select Unload Box Into Processor to configure it.
    1. Underneath Executer/Task Sequence, type "token.AGV".
    2. Underneath Item, type "token.box"
    3. Underneath Station, type "token.processor"
    4. Note: this will unload the box into the acquired processor.
  10. Select Travel Back to Queue1 to configure it.
    1. Underneath Executer/Task Sequence, type "token.AGV".
    2. Underneath Destination select the sampling tool. In the 3D model, select the control point where you would like the AGV to wait for another box.
  11. Select Release AGV to configure it. Underneath Resource(s) Assigned To type "token.AGV". The AGV is no longer assigned to this token.
  12. Select Wait for Event Processor Finish to configure it.
    1. Underneath Object, type "token.processor".
    2. Underneath Event, type "OnExit"
    3. Note, this will ensure that the processor cannot be acquired until it is finished processing.
  13. Select Release Processor. Underneath Resource(s) Assigned To, type "token.processor".

This should give you the behavior that you are looking for.

load-and-go-model-updated.fsm


· 3
5 |100000

Up to 12 attachments (including images) can be used with a maximum of 23.8 MiB each and 47.7 MiB total.

Felipe P2 avatar image Felipe P2 commented ·

Hi Benjamin! Thank you so much for your help. The information you sent plus the model you attached saved my project!! I really appreciate the effort you put on this.

I would like to ask you one more question, if possible:

How can i set travel times to the task executers? So i can control the time it takes for them to go from the queue to the control points?

Once more, than you very much!!

Regards,

Felipe

0 Likes 0 ·
Felipe P2 avatar image Felipe P2 commented ·

Benjamin, I am working with the model that you sent and also realised that when the task executer delivers an item to Processor 2, it doesn´t travel to Control Point 7, as it should. Do you have any idea of how can i solve this?

Once more, thank you!!

Kind regards,

Felipe

0 Likes 0 ·
Benjamin W2 avatar image Benjamin W2 Felipe P2 commented ·

Hi @Felipe P2, I updated my answer to include a Travel to Processor in step 8. This makes the AGV travel to processor 2. As far as adjusting the speed of the Task Executors, click on the "AGV Network" underneath the Toolbox. Here, you should be able to adjust the speed of the AGVs.

Let me know if you need any more clarification!

0 Likes 0 ·
Felipe P2 avatar image
0 Likes"
Felipe P2 answered

Thank you very much!! I added the activity and it worked.

You were very helpful.

Kind regards,

Felipe

5 |100000

Up to 12 attachments (including images) can be used with a maximum of 23.8 MiB each and 47.7 MiB total.

Write an Answer

Hint: Notify or tag a user in this post by typing @username.

Up to 12 attachments (including images) can be used with a maximum of 23.8 MiB each and 47.7 MiB total.